
Past Echos the Future (Part I) - Notes on SGI / IRIX Stuff
Vintage SGI (Silicon Graphics Incorporated) notes.
Status: 29 July 2021 - Split into Part I & Part II
I have some very old high watt, low computational power SGI / IRIX machines. These have been under my care for sometime, and over the years I was member on "Nekochan", as the go to place for various tips on keeping these machines going.
To the great disappointment of many old time SGI geeks "Nekochan" has now gone to the internet graveyard.
If you are have an SGI / IRIX problem then a lot of the Nekochan refugees are now over on "IRIX Network".
So why this interest in old SGI / IRIX machines?
The reasons are N fold:
- These machines were the coolest things since sliced bread when I was first out of uni and doing my post graduate studies at RMIT which included both Graphics and AI units. Both Graphics and AI are still relevant today
- I went to a "Performance Co-Pilot" birds of feather session earlier in the year (2020). The core "Performance Co-Pilot" team are a bunch of Melbourne based ex-SGI employee's who have been working on this for over 20 years! So it was really interesting to hear what they had to say. My observation is that the collectd and Fluentd are treading over the same ground still.
- Many of things that are critical to working with NFVi and cloud infrastructure were available in old SGI machines well before anywhere else including: NUMA (non-uniform memory architecture) which is part of cpu / multi-core Intel server architecture (understanding NUMA is essential to getting best performance from NFVi platforms), L1/L2 seperate systems monitoring and control systems which provide ability to remotely manage and partition the physical infrastructure, Graphics and Video Processing acceleration using specialise CPUs and FPGAs.
- I turn on my old machines periodically to see if they are still working, as I expect that at some point, leaky capacitors or dead batteries will kick in and kill them...
This post is not in anyway trying to emulate the wealth of useful information that was on "Nekochan" rather it is just my personal links and tips so I can avoid having to relearn / retest this stuff should I need to redo any of this in the future...
As I was finding it hard to reference my own notes I have split up my SGI / IRIX notes, into the following blogs:
- Past Echos the Future (Part I) - Notes on SGI / IRIX Stuff - this blog
- Past Echos the Future (Part II) - O350 / Chimera Stuff... - notes on Chimera architecture machines including: Origin / Onyx 350 (O350), Onyx4 (ATI Based Graphics), Tezro, Fuel & assoicated L1, L3 & L3 Controllers & Numalink Routers (serial flipping)
- SGI Onyx 350 - Racking and Stacking - notes on putting together Onyx 350 with IR4 in SGI 3000 Series "Hour Glass" rack and required cabling and power needs
- What is inside that box? - SGI hinv - my hinv reports as it did not make sense to split these across Part I & Part II blogs
- SGI NVRAM & Time Keeper Chips - one of the most common hardware failure points for vintage SGI machines is the DALLAS and Snaphat chips
- Creaky Old Fedora Core Linux for SGI L3/L2 - trying to get L2 emulator and L3 controller up and running on virtual Linux machine (note it works on physical machine)
- See SGI IRIX Man Pages online (and code) ...
IRIX Boot Disk
Installing IRIX can be a bit frustrating, as after going to the trouble of loading all the installation disks and dealing with conflicts, I often find that the machine then fails initial boot after the install has completed.
So what is needed to make a disk bootable ?
The IRIX boot process consists of:
- PROM loads from flash and NVRAM variables
- Load the disk volume header (s8 == boot disk/partition 8 volhdr)
- Load the "standalone shell" (sash) from the volume header
- Load the OS based on bootinfo within sgilabel within the volume header. This identifies the root partition (s0) , the swap partition (s1) and the name of kernal file to boot ("/unix") in the sgilabel, optionally the volume header may also have a "usr" partition (s6).
So if the machine does not boot then likely cause are:
- volume header does not contain the required programs (these vary based on the machine type, but should always include "sash"
- volume header does not have required "bootinfo" ("/unix") in the sgilabel
This can be verified by booting into the command prompt, then doing: "ls", typically the result is the directory of the volume header:
- for Octane - this will include: IP3oprom, ide, sash
- for O350 - this will include: sash, symmon
If you do not see anything then the install process has failed to put in volume header contents. This can be fixed by putting disk into another machine and putting in header contents using "dvhtool".
If the header contents look ok, then look at the result of PROM "printenv" command ("OSLoadFilename=/unix") to see if boot file is defined or not. If not then use "fx" to ensure that the sgilabel includes the parition (root == s0, swap == s1) and kernel details ("boot=/unix").
Understanding the disk layout is also important when cloning a disk using xfsdump/xfsrestore. As this will successfully copy the file systems partitions, but will not copy the volume header contents and information.
To clone a boot disk you need to make sure you also copy out the volume header contents and copy these back into new cloned disk (again using dvhtool).
In Situ Boot Disk Repair (Testing)
What do you do if the an IRIX machine that you expect to have valid boot fails ?
In the above I say "This can be fixed by putting disk into another machine ...".
But what if you do not have a second machine to put this disk into, and you really want to preserve your existing boot disk ?
There are a few basis reasons why you might end up in this situation:
- Disk volume header has not got required flags
- Root disk partition got corrupted
- Some SCSI failure
- Some disk failure
For SW failure cases (1 & 2), there are some things you can do to see what is going on before resorting to doing a OS re-installation and losing your existing disk.
There are two different ways to do this, via CDROM or via bootp.
I am going to describe the way I did it via bootp, as I do not have any IRIX CDs on hand, but do have lots of disk images. I am also going to describe this for 64 bit IRIX only as I do not have any 32 bit machines.
So lets start with fx:
- Loading standalone fx lets you look at your disks partitioning and your labels.
- It does not allow you to check the actual file system contents (this needs sash)
- To boot to fx, from the PROM command prompt: boot -f bootp()192.168.XX.XX:/PATH/fx.64 --x
- For CDROM I think you would have to first load the sash (from CDROM volume header) and then from there run fx
- This example assumes you are on a class B internal 192.168 network. You can confirm network connectivity by first doing a "ping".
- If ping fails then likely cause is that you NVRAM "netaddr" variable is the default IRIX network and you need to change this to match the network that your in built network interface is on. Ths address you use has to be free not already used on network. Set this via PROM "setenv" command and reboot and retry
- Once in fx you can look at this default controller (0) and find the boot disk and look at the label (show/labels/all)
- You should also be able to see if the disk volume header has "sash" installed
- As above boot disk should have boot parameters set with "boot=/unix" and disk should have root xfs partition.
- While you can easily update the boot parameters with fx, if the disk is missing the volume header contents then you have to run "dvhtool". I am not sure if this is available via sash ...
- CAUTION: If you believe that disk should have partition but does not then you can elect to repartition disk. If you do this, ensuring that the re-partition is exactly as it was previously then this will not destroy the previously existing IRIX file system. But is is dangerous with high likelihood of failure if you did anything non-standard (ie changed the swap partition allocation).
Ok so lets assume fx come back positve, so now you can load sash ("standalone shell"):
- loading sash allow to mount file system and to limited file and other operation
- to boot to fx, from the PROM command prompt: boot -f bootp()192.168.XX.XX:/PATH/sash
- sash is not directly available from CDROM contents, instead you need to have copied sash out of an existing bootable IRIX disk and saved it away for load via bootp
- Note: sash is machine dependent, with a 32 bit (arcs) and 64 bit version existing, in my example I am using 64 bit version (Octane/Fuel)
- If you are using direct CDROM then you should be able to boot to sash via the CDROM volume header.
- One in sash you do "poke around" and you can also invoke "install" should you want to go into new install process.
- CAUTION: this is exploratory territory and you can both break things and fix things
NOTE #1: I am not sure about dvhtool availablity, but when doing a clean install on a new disk IRIX must write into the disk volume header, so there must be some way to write into the disk volume header. Some extra testing needed to find this out.
IRIX 6.5.X Network Install
Here is high level summary of IRIX 6.5 network install. See Ian Mapleson's SGI Depot Network Install guide and IRIX TechPubs for additional information;
This installation was for Tezro. IRIX Tezro support starts at 6.5.21 (so I used 6.5.22 to allow for bug fixes). The installation overlay disk has a number of "kernels" in the miniroot directory for different hardware including:
- unix.IP27 - Origin 2000
- unix.IP30 - Octane
- unix.IP32 - O2
- unix.IP35 - O3000, O300, O350, Tezro & Fuel
The boot process uses BOOTP, tftp and rsh (shell). Here is outline of basic steps:
- In preparation for network install you should edit inetd (/etc/inetd.conf) to enable bootp, tftp and shell on the "Install Server" machine. On client machine ensure the "netaddr" environment variable has valid IP address for your network
- Ensure there is "guest" account access on "Install Server" to images by editing: /etc/hosts.equiv and ~guest/.rhost
- Follow Ian Mapleson's instructions to get "Install Server" setup (this involves copy each of IRIX Software Library CD's to disk and optionally creating symlink short cuts to these (to avoid having to retype long names all the time)
- Use 6.5.22 /miniroot/unix.IP35 as boot image for Tezro/Fuel/O350 (see above for alternates).
- Use fully qualified host names when referring to source files and full directory paths (ie for boot: "boot -f bootp()X.X.XX:/INSTALL/fx.64 --x" to startup fx.64 to partition new disk as part of installation process). As tftp and rsh transparently follows softlinks you can add shortcut links into your target installation directory to avoid having to type very long file names. So for this fx example the "/INSTALL/fx.64" links to: "/usr/people/shared/softlib-update-6.5.21/irix-6.5.21-overlay-1/CDROM/stand/fx.64" which is where I copied CD contents to.
- If you have disk partiationed and ready to go then return to boot options screen by exiting prom and select "clean install"
- Start with: "/INSTALL/6.5.x/ol-1/dist/" (links to: "/usr/people/share/softlib-update-6.5.x/irix-6.5.x-overlay-1/CROM/dist/"). Be sure to put trailing slash "/" on the directory name or install process will not find files.
- Proceeed through: ol-2, ol-3, apps, foundations-1, foundations-2, nfs-v3
- Then select "done"
- At "INST>" prompt:
keep *
install standard
go
11. Address conflicts. Generally the <N>a option is always faster path to resolution
NOTE #2: Once you have bootable machine you can install additional software via GUI
SGI Machines - Serial Number Locations and Setting
Most commerical software that runs on SGI / IRIX machines uses the FLEXlm license management system.
This includes the: MIP/Pro Compilers, the Impressio PostScript Printing / Scanning Suite, Alias Maya, Wolfram Mathematica, Discreet Flint, Flame and Inferno and its other combustiable friends, Adobe Suite, Insignia SoftWindows, Xinet AppleTalk Suite and SGI's own XVM and other extra software packages.
When you install IRIX it will install the license manager and some trial license and also software which will prompt for license details at startup.
For a given machine the software is likely be to "nodelocked" which means the license is tied to a particular machine.
The ID of your machine can be found by using the "lmhostid" command. How the ID is allocated varies dependent on the machine type. On some machines the ID is based on the Ethernet MAC address, while on others it is just a number that is assigned arbitarily (with certain contraints) and is stored in battery backed NVRAM.
Here is summary of the Serial Number locations on and setting on various machines (where I have verified and tested this I note as such):
- Indy's (untested and speculative) - uses Ethernet MAC ID based serial numbers, but I have read that Indy's can loose there MAC ID and it is hard to get the number restored...
- Octane/Octane2 (tested and verified) - have an "ID in a can" chip that sits on the XBOW front plane board and looks like a "button battery". While these look like a battery they are non-volatile and can be taken out and moved from one Octane to another to allow the machines ID and its software licenses to moved from machine to machine. This is very handly and I have used this to maintain the ID on my Octane2 that was originally an Octane that came with lots of licensed software.
- Fuel (tested and verified) - the serial number is stored on the DALLAS DS1742W-120 battery backed NVRAM IC that is on the main systems board (see my chip hacking blog for more info). As this is stored in battery backed NVRAM the ID will get lost if the battery dies. But while the ID might get lost, the allocation of this is taken from the on board Ethernet MAC address. So if you put in a new cleared DALLAS chip into your Fuel and boot it, then it will establish its MAC based ID on restart. You can get the serial number by accessing the L1 controller (either via serial comms port or via L2 Controller). You can also assign the ID via the L1 "serial" command, but it will only accept a command that has the same format as MAC address. The Fuel will not take on the Serial Number of a connected L2 (see O350 below).
- O350 / Chimera (tested and verified) - the O350 / Chimera machines cover the Origin 350, Onyx 350, Onyx4 and Tezro machies (Fuel is also a variant of these). Like the Fuel these store there Serial in the DALLAS DS1742W-120 chip, but unlike the Fuel this ID has no relation to the Ethernet MAC address. As these machines are "modular" and can be connected together via Numalink the serial number is purely logical and arbitary within the following contraints: Tezro machine (desktop and rackmount) have format - PXXXXXXX, Origin/Onyx 350 and Onyx4 have format - MXXXXXXX, which is numerical. You can assign individual machines serial numbers via L1 or L2 Controller. If you boot an O350 series machine while it attached to an L2 Controller (with MXXXXXXX id), it will take on the id from the L2 Controller automagically. If you have a number of machines numalink'ed together then they will all take on the id of the boot host or L2. The exception is a Numalink Router (R Brick). Numalink Router enable serial security and once it is assigned an ID then you cannot automatically re-assign it by connecting it to L2 or other O350 chassis. In fact if you have Numalink Router with different serial number to other machines then it will stop the machines from communicating and report a serial number conflict. There are two easy way to get around this: either put in cleared new DALLAS DS1742W-120 chip or via L1 or L2 use the "let the carnage begin" command to disable the serial security and set serial back to "zero". Again see my chip hacking blog for additional info.
- Tezro (tested and verified) - as above the Tezro is a variation of the Chimera family, but it uses a serial format - PXXXXXXX . And you can convert rackmount Tezro to/from O350 machines using the L1 "make rmws" command (rmws == rack mount work station). So to create an rack mount Tezro from an O350 use: "make rmws 1" and then to convert it back use "make rmws 0". The results in two things. It means the node will now enforce PXXXXXXX format ids and it disables the ability to connect machines via Numalink Router, though you can connect a pair of "rack mount work stations" together directly with numalink cable. The reason why you might want to turn your more flexible O350 into a less powerful Tezro is because you need to use software that is tied to the PXXXXXXX system id.
- O3000 (unverified) - the big iron Origin/ Onyx machine have the same behavior as the O350 ones. The difference is that they have serial format - LXXXXXXX. These also store the ids in DALLAS DS1743W-120 NVRAM chips. Like O350 there serial can be assigned via L2 or L2 controller and will automagically take on the serial from the L2 is started with this connected.
- O300 (unverified) - I have never had an O300 to play with, but by all accounts the behavior is as per O350 including use of MXXXXXXX format serial.
NOTE #3: Web Archive links are to last archive page for that product, after which the Product typically moves into the "Remarketed" section.
DM10 Firewire - Adaptec AUA-3020 (Blue / Rev. B) - 3 USB + 2 Firewire & AFW-4300B (Red / Rev 1.1) cards
In Nekochan days there was a lot of interest in trying to get "Firewire" working with SGI / IRIX machines. This was due to providing a cheap path to getting digital video into / out of the machines and it allow you to connect DVD and other Firewire devices to the machine.
SGI officially has two variations of Firewire adaptors:
- DM10 - board which worked in Octanes, O3000/O300/O350 machines with PCI buses
- DVLink - board with work in O2 machines.
The DM10 board was a bit of a mystery and as there were very few of these out in the wild people could not test with them (and they were to expensive for hobbiest to buy). After time it was learnt that the DM10 was essentially an OEM'ed version of an Adaptec board, which in turn has Texas Instruments (TI) chipset. There was lots of excitement and people found that certain Adaptec and SIIG boards "worked" as long as they had the right TI chipset.
I say "worked" as even the original SGI DM10's appeared to have flacky drivers and only worked with a very small number of devices. It was also found that Adaptec made a board which had Fireware and USB with the right TI (Firewire) and NEC (USB) chipsets and these appeared to work on Fuel's and possibly O350s, if you set the right Kernel parameters.
I found that if you put these board into Octane with the Kernel parameters set, then you machine would go into a boot crash loop. So here is information on the various DM10 / Firewire testing with the Adaptec boards,
There are two variations of Adaptec Firewire boards that work (to a lesser and greater extent) with IRIX on Fuel, Tezro (not tested), O350 & Octane. When working correctly they will report as DM10 and IEEE1394 SCSI in hinv.
Correct installation requires 6.5.29/30 and IRIX Firewire 1.1 (Beta) and if installation is working then should be able to get results from "fwprobe" command that reports on board and connected devices without any additional "hacking" or work arounds.
The two variations are:
- Adaptec AUA-3020 (Blue / Rev. B) - has 3 x USB + 2 x Full Size FireWire. There is another variation of this board which has 1 x Full Size FireWire + 1 x Mini FireWire (this is kwown as Rev. A). Both of these boards have NEC USB and Texas Instruments FireWire chips.
- Adaptec AFW-4300B (Red / Rev. 1.1) - has 3 x Full Size FireWire. This board has Texas Instruments FireWire chips. There is another variation of this board with blue PCB which is known not to work with SGI / IRIX.
To use the AUA-3020 on Fuel / O350 you need to set the "systune" kernel configuration parameter:
systune pciio_multimaster_override 1
reboot
See "Internet Archive - Way Back Machine" - "USB Card and the Fuel"
NOTE #4: In testing on Octane2 adding card to PCI Cage and configuring "systune" parameter causes a kernel crash at boot. Only way to fix is to remove the card from PCI Cage. Without systune "fix" card is not recognised.
NOTE #5: In testing with Fuel with multiple PCI cards installed I have found that AUA-3020 causes kernel crash irrespective of "systune" configuration. So given that Fuel already has USB built in I would just use Adaptec AFW-4300B (see below).
The AFW-4300B (Firewire only) works and reports as DM10 and IEEE1394 SCSI on Fuel, Tezro, O350 and Octane.
However operation on Octane is problematic and fwprobe does not report finding the board and connected devices. I have found that on Octane only IEEE1394 SCSI appears to work and IIDC FireWire Camera (Apple iSight) does not report correctly. Getting fwprobe to report correctly requires considerable hacking of HW / FW filesystem.
In testing with Apple iSight Firewire camera on Fuel. I have found that the AFW-4300B works with both the M8817ZP/A & M8817ZP/C version of the camera (I do not have /B variation).
---
--- Check that FireWire Device is there...
---
# fwprobe
Probing DM10 cards...
Number of cards: 1
Card Info
=========
Card #: 0
Name : DM10
ID : 0x0
Ports : 3
Speed : 400 / 400
2 devices attached
Device 0: 0x0
Vendor: Silicon Graphics, Inc.
Model: DMediaPro DM10
Proto: HBA
Device 1: 0xA2700040DEDAA
Vendor: APPLE COMPUTER INC.
Model: iSight
Proto: IIDC
---
--- FireWire uses OpenML (ml - media library) not the videod (video daemon)
---
# mlquery
SYSTEM: pink.XX.XX
DEVICES:
iidc-camera:0
nullXcode:0
Vendor: APPLE COMPUTER INC.
Model: iSight
Proto: IIDC
---
--- Only tool to get video camera is by compiling the provided example
--- There is a makefile in the directory: /usr/share/src/dmedia/video/iidc
---
# /usr/share/src/dmedia/video/iidc/iidc_vidtogfx -d iidc-camera -D
Input Timing Present = ML_TIMING_525
[iidc-camera] Image Sampling not supported with this device
Couldn't set controls on video jack (ignoring)
ML_IMAGE_SAMPLING_INT32 = ML_SAMPLING_444 (length -1)
ML_VIDEO_TIMING_INT32 = ML_TIMING_525
mlPvToString: ML_STATUS_INVALID_PARAMETER
Timing 2
[iidc-camera] Image Sampling not supported with this device
Couldn't set controls on path
ML_IMAGE_COMPRESSION_INT32 = ML_COMPRESSION_UNCOMPRESSED
ML_IMAGE_COLORSPACE_INT32 = ML_COLORSPACE_RGB_601_FULL
ML_IMAGE_SAMPLING_INT32 = ML_SAMPLING_444 (length -1)
ML_IMAGE_PACKING_INT32 = ML_PACKING_8
mlPvToString: ML_STATUS_INVALID_VALUE
mlPvToString: ML_STATUS_INVALID_PARAMETER
---
--- Read the source code to see the sampling options..
--- and not the that -c flag request that camera runs continously
---
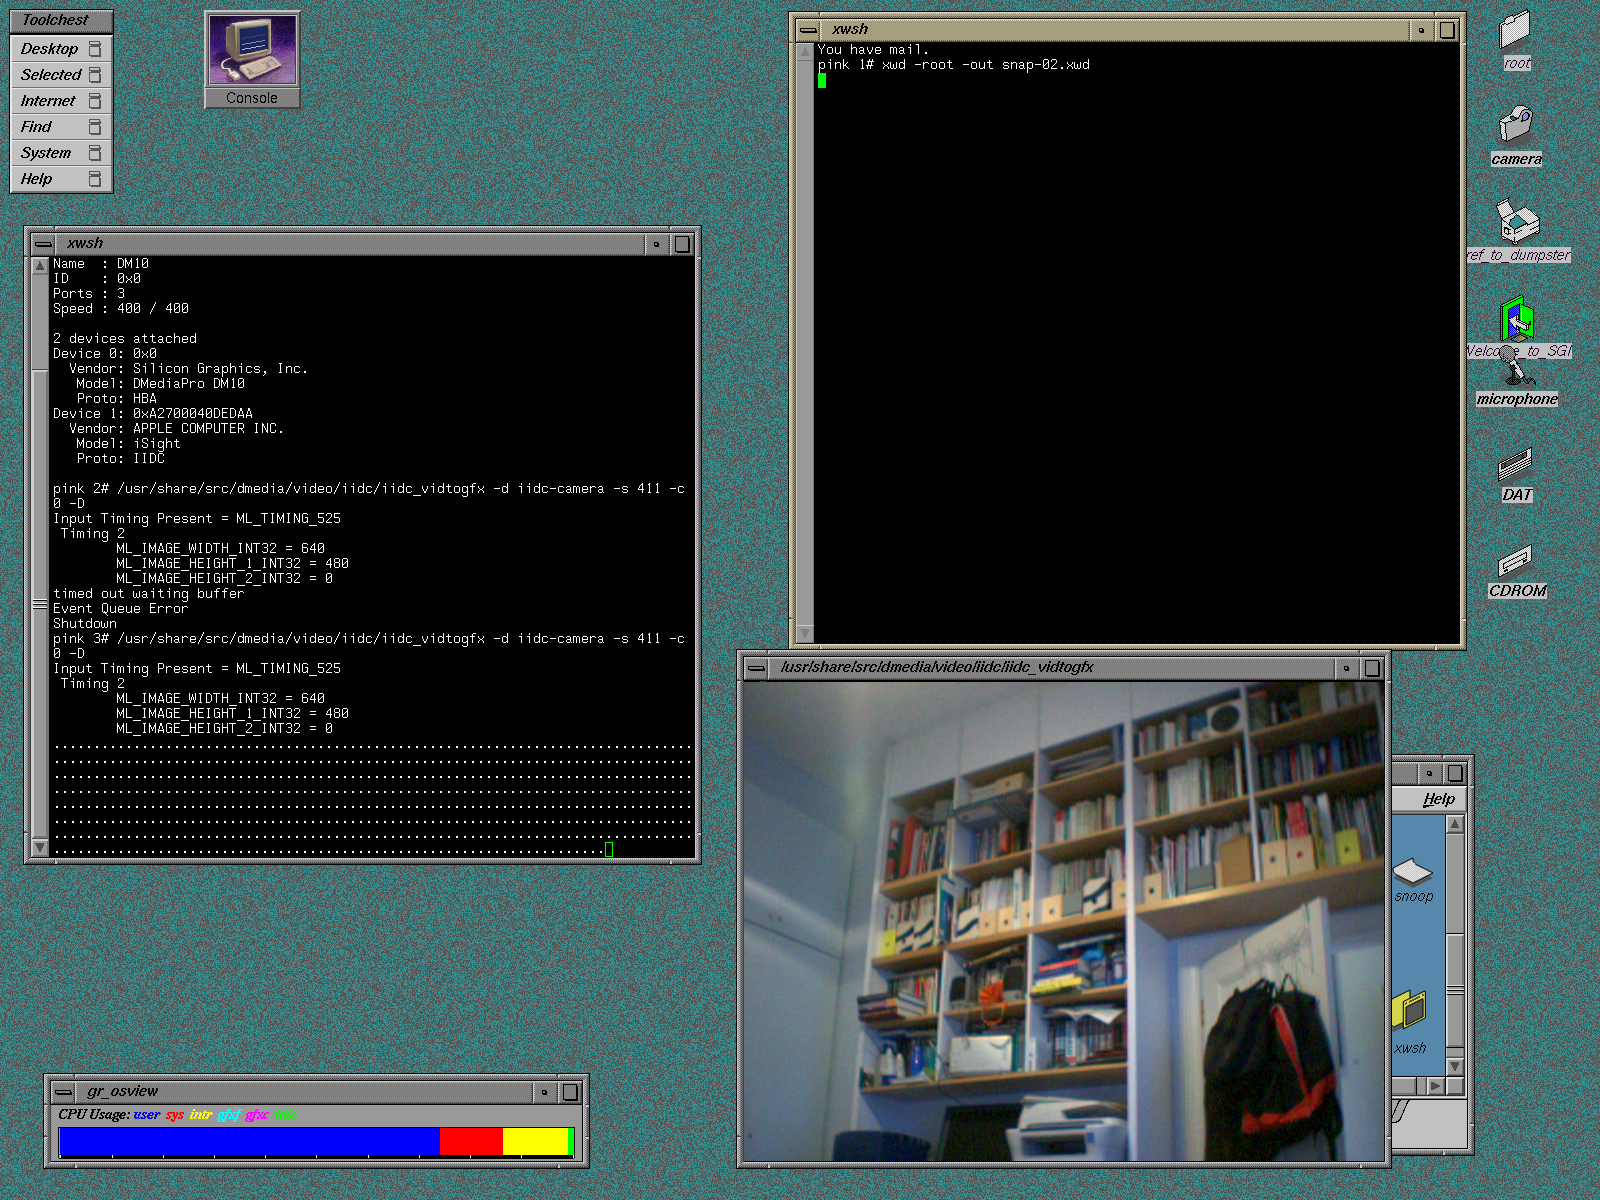
# /usr/share/src/dmedia/video/iidc/iidc_vidtogfx -d iidc-camera -s 411 -D
Input Timing Present = ML_TIMING_525
Timing 2
ML_IMAGE_WIDTH_INT32 = 640
ML_IMAGE_HEIGHT_1_INT32 = 480
ML_IMAGE_HEIGHT_2_INT32 = 0
............................................................ShutdownNOTE #6: This is all documented in the old Nekochan thread, except that it works for /A & /C camera versions.
And here is screen snapshot via "xwd -root -out snap-01.xwd", which I then converted to png via gimp:
Resetting Graphics Resolution
The IRIX graphics resolution settting can be managed via UI Display Setting panel, but if you set them to a particular resolution (1600x1200 @ 60HZ say) and then change monitors to one that does not support the settings, then you might find you cannot get to GUI any more.
Here are some useful tips:
- The utilities for graphic are in: /usr/gfx , including gfxinfo (get current graphics pipeline info) and setmon (set the resolution for monitor)
- The set of valid resolutions are in: /usr/gfx/ucode/<YOUR-TYPE>/vof
- Graphics types include: ODSY - Odyssey/VPro (V12/V10/V8/V6), IMPACT - Impact (MXE/SSE/SE)
- X11 Monitor Settings are in: /var/X11/Xvc
So to reset you graphics you can:
- Reboot machine in single user mode (results in default resolution: 1280x1024 on VPro) and set do /usr/gfx/setmon -x <1600x1200_60> – for example (see /usr/gfx/ucode for valid options)
- Simply delete the: /var/X11/Xvc/<TYPE>0_TimingTable file and it will regenerate using default on reboot
- If you can't get into single user mode, then telnet into machine and delete TimingTable file
- Here are sample Timing Table's:
 -- here is V12 in 1280x1024 @ 60 SAFE
# cat Odyssey0_TimingTable
1280x1024_60_safe
16
1
--- and V12 when in 1600x1200 @ 60
# cat Odyssey0_TimingTable
1600x1200_60
16
1
-- and here is IMPACT (MXE) in 1600x1200 @60
# cat Impact0_TimingTable
1600x1200_60
This works for most cases, but not for InfiniteReality machines. For these machines the resolution is written to eeprom and not saved in /var/X11/Xvc. So to change resolution to a "safe" setting you will need to telnet/ssh into the machine and change the setting via setmon, ircombine or ireeprom commands. See following section:
Resetting InfiniteReality (KONA) Graphics Resolution
For InfiniteReality machines, the graphic configuration is written to eeprom. So to change resolution to a "safe" setting you will need to telnet/ssh into the machine and change the setting via setmon, ircombine or ireeprom commands.
To use the "ircombine" command you need to have X11 DISPLAY environment variable set. If you have ssh'ed or telnet'ed into machines you are not in an X session, so you will need to manually set the X11 DISPLAY environment variable prior to setting the resolution (for the first display this will be ":0.0"):
---
--- Using csh / tcsh
--- NOTE: for bsh set the environment variable  by:
--- DISPLAY=:0.0
--- export DISPLAY
---
# setenv DISPLAY :0.0
# cd /usr/gfx/ucode/KONA/dg4/vfo
# /usr/gfx/ircombine -destination eeprom -channel 0 format=1280x1024_60.vfo
# /usr/gfx/stopgfx
# /usr/gfx/startgfx
NOTE #7: If you get error about display not found then it is likely that the X Windows systems is not running. This can be stopped / started by: "/usr/gfx/stopgfx" and "/usr/gfx/startgfx". To make sure that graphics is started on boot make sure the "chkconfig" variable: visuallogin, windowsystem and xdm are set to on:
# chkconfig
        Flag                 State
        ====                 =====

        acct                 off
        appletalk            on
        ...
        visuallogin          on   <<===
        vswap                off
        webface              off
        webface_apache       off
        windowsystem         on   <<===
        xdm                  on   <<===
        xfwp                 off
        xlv                  on
        yp                   off
        ypmaster             off
        ypserv               off
There is also an undocumented command: ireeprom which can be used to clear the KONA eeprom:
---
--- KONA is internal name for InfiniteGraphics graphics system
---   So see KONA specific utilities: cd /usr/gfx/KONA/bin
---      you will see ireeprom, but man this gives no info...
---
# man ireeprom
No manual entry found for ireeprom.
---
--- So use -h flag
---
# /usr/gfx/KONA/bin/ireeprom -h
Usage: ireeprom [-wrivh] [-p pipenum] [-f datafile]
        -w: Write EEPROM from file
        -r: Read EEPROM into file
        -e: Erase EEPROM
        -c: Erase EEPROM video combination
        -v: Verify contents of EEPROM
        -i: Print EEPROM information
        -F: Forcibly load older revision
        -h: Print this help message
        -p <pipenum> : Specify pipe number
        -f <datafile>: Specify datafile
---
--- -i give info
---
# /usr/gfx/KONA/bin/ireeprom -i
==== Pipe 0 ====
Manufacturer code:      0x1f
Device code:            0xc4
State:                  Good
Revision:               131
timestamp:              Thu Jun 30 22:30:35 2005
Code+data length:       0x1f2fc
Checksum:               0x00a38351
---
--- As per help -c will clear the eeprom and graphics will operate
---   with default (safe) settings: 1280x1024 @ 60 HZ
---
Video Format Compiler - Testing with Dell U2412W & InfiniteReality Graphics
NOTE #8: Tested and now working with InfiniteReality graphics
The SGI graphics devices use "video format output" (.vfo) microcode files to generate monitor timing signals.
These are generated using the "video format compiler". The generated .vfo file is specific to the graphics architecture (IMPACT, VPro, InfiniteReality). In theory you should be able to get the SGI machine to work with most displays (with Sync on Green) by defining the "video definition specificiation" .vfs file and then compiling this to generate the .vfo file.
In practice the .vfs requires low level video timing information that is generally unavailable (except by reading EDID signalling which is used by displays to communicate its capabilities to the video signal generator) and hence it is not possible to generate a new specification for a given monitor, by just having consumer level details.
As I was having trouble with Dell U2412M LCD monitor when using 1920x1200 @ 60 Hz resolution (display quality was very poor and sync was eratic), I decided to see if I could resolve this by generating a custom .vfo file.
I found these old "Nekochan" threads on Web Archive and on the Nekonomicon both by "recondas" on generating the .vdo files.
One post pointed to the "PowerStrip" utility program to get the video signal timings.
So I plugged a Dell U2412M monitor into Windows XP box with PowerStrip and got the following video timings:
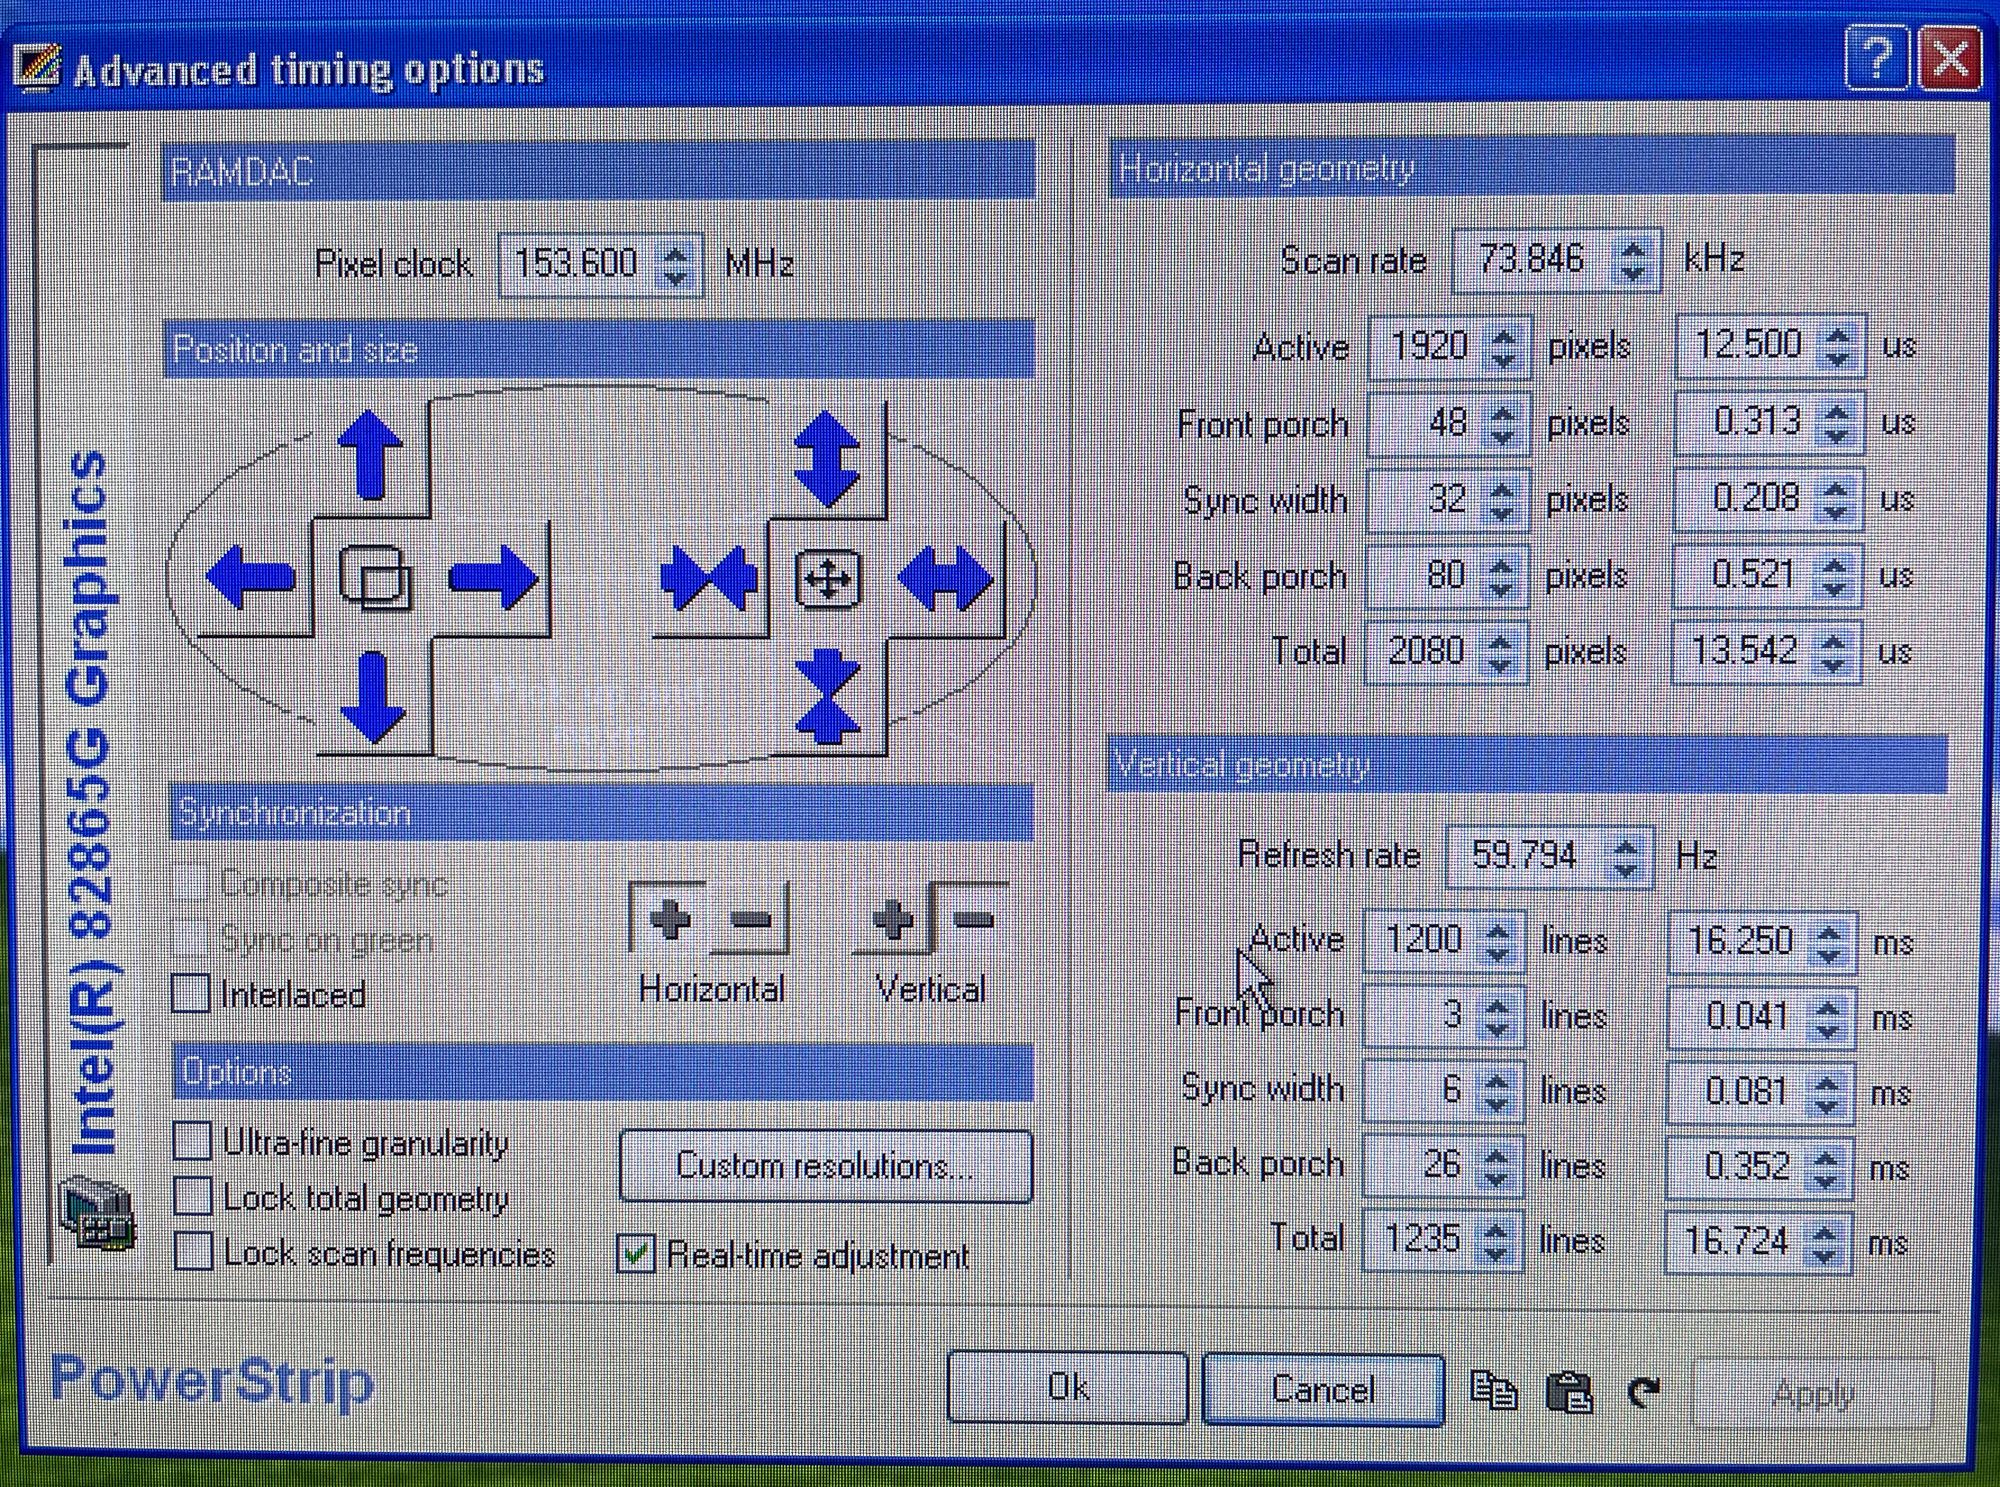
Delving a bit further I found a Linux project "read-edid" which provides EDID extract and parsing tools. This package is available for Ubuntu, so is likely a better option for most IRIX / UNIX people (including myself). The package needs to be installed ("sudo apt install read-edid"). Here is output from get-edid (with monitor connected to vga port):
$ sudo get-edid | parse-edid
[sudo] password for XXXX:
This is read-edid version 3.0.2. Prepare for some fun.
Attempting to use i2c interface
No EDID on bus 0
1 potential busses found: 1
128-byte EDID successfully retrieved from i2c bus 1
Looks like i2c was successful. Have a good day.
Checksum Correct

Section "Monitor"
	Identifier "DELL U2412M"
	ModelName "DELL U2412M"
	VendorName "DEL"
	# Monitor Manufactured week 24 of 2012
	# EDID version 1.3
	# Analog Display
	Option "SyncOnGreen" "true"
	DisplaySize 520 320
	Gamma 2.20
	Option "DPMS" "true"
	Horizsync 30-83
	VertRefresh 50-61
	# Maximum pixel clock is 170MHz
	#Not giving standard mode: 1280x960, 60Hz
	#Not giving standard mode: 1280x1024, 60Hz
	#Not giving standard mode: 1600x1200, 60Hz
	#Not giving standard mode: 1680x1050, 60Hz
	#Not giving standard mode: 1920x1080, 60Hz
	Modeline 	"Mode 0" 154.00 1920 1968 2000 2080 1200 1203 1209 1235 +hsync -vsync
EndSection
The key information is encoded in the "Modeline" at the bottom:
- Format: - "Modeline" <MODE> <PIXEL CLOCK> <H ACTIVE/DISPLACEMENT> <H SYNC START> <H SYNC END> <H TOTAL> <V ACTIVE/DISPLACEMENT> <V SYNC START> <V SYNC END> <V TOTAL> <HSYNC> <VSYNC>
Where - H == HORIZONTAL & V == VERTICAL
You will need to do some simple calcuations to get inputs for .vfs spec:
- <BACK PORCH> = <TOTAL> - <SYNC END>
- <SYNC> = <SYNC END> - <SYNC START>
- <FRONT PORCH> = <START SYNC> - <ACTIVE/DISPLACEMENT>
Using this I created the following .vfs specification:
/*
 what: video spec for Dell U2412M monitor using
         EDID information from: powerstrip (win) / get-edid (linux)
*/
General {
 FormatName = "1920x1200_60-U2412M";

 FieldsPerFrame          = 1;
 FramesPerSecond         = 59.94;
 TotalLinesPerFrame      = 1235;
 TotalPixelsPerLine      = 2080;
 ActiveLinesPerFrame     = 1200;
 ActivePixelsPerLine     = 1920;
}
Active Line {
 HorizontalBackPorch     = 80 pixels;
 HorizontalSync          = 32 pixels;
 HorizontalFrontPorch    = 48 pixels;
}
Field {
 Vertical Sync =
 {
  {
  Length = 1.0H;
  Low = 0.0 usec;
  }
  repeat 6
  {
  Length = 1.0H;
  }
 }
 Initial Low;
 Vertical Back Porch =
 {
  {
  Length = 1.0H;
  High = HorizontalSync;
  }
  repeat 26
  {
  Length = 1.0H;
  Low = 0.0 usec;
  High = HorizontalSync;
  }
 }
 Initial High;
 Active =
 {
 repeat 1200
  {
  Length = 1.0H;
  Low = 0.0 usec;
  High = HorizontalSync;
  }
 }
 Vertical Front Porch =
 {
 repeat 3
  {
  Length = 1.0H;
  Low = 0.0 usec;
  High = HorizontalSync;
  }
 }
}
#if 0
postprocess
{
dump edge;
}
#endif
First compiler test run, resulted in errors:
# vfc -a ascii=1920x1200_60-u2412m.info -c board=/usr/gfx/ucode/vfc/rules/dg4.def,chip=voc1.def -o 1920x1200_60-u2412m.vfo 1920x1200_60-u2412m.vfs
"./1920x1200_60-u2412m.vfs", line 61: You specified sync on line 1236 but the format has only 1235 lines per frame.
Shorten your format definition.
"./1920x1200_60-u2412m.vfs", line 62: You specified sync on line 1236.02 but the format has only 1235 lines per frame.
Shorten your format definition.
"./1920x1200_60-u2412m.vfs", line 61: You specified sync on line 1237 but the format has only 1235 lines per frame.
Shorten your format definition.
"./1920x1200_60-u2412m.vfs", line 62: You specified sync on line 1237.02 but the format has only 1235 lines per frame.
Shorten your format definition.
Compilation completed with errors.  No video format created.
The "Shorten your format definition." error was identified by "recondas" when doing his work with the Video Format Compliler back in nekochan days. The workaround is to adjust the Vertical Back Porch value (subtract 2) while keeping the other values unchanged. According to recondas, the reason is that the vfc compiler uses an industry algorithm for its calculation and not simple integer arithimtic.
The end resut is that the generated adjusted: Vertical Back Porch + Vertical Sync = Unadjusted Total (32 in this example). This can be seen in the generated info file.
So adjusting the .vfs file and recompiling:
---
---
---
# vfc -a ascii=1920x1200_60-u2412m.info -c board=/usr/gfx/ucode/vfc/rules/dg4.def,chip=voc1.def -o 1920x1200_60-u2412m.vfo 1920x1200_60-u2412m.vfs
---
--- Now looking at the generated info file...
---
# more 1920x1200_60-u2412m.info
1920x1200_60-u2412m.vfo:
 Total lines per frame:   1235
 Total pixels per line:   2080
 Active lines per frame:  1200
 Active pixels per line:  1920
 Frames per second:       59.94
 Fields per frame:        1
 Swaps per frame:         1
 Pixel clock:             153.974 MHz, period = 6.49461 nsec
 Hardware pixel rounding:  every 4 pixels
 Line analysis:
  Length:                 2080 Pixels, 1 Lines, 13.5088 usec; (line 0)
  Frequency:              74.0259 KHz, period = 13.5088 usec
 Horizontal Sync:         32 Pixels, 207.827 nsec; (line 32)
 Horizontal Back Porch:   80 Pixels, 519.569 nsec; (line 32)
 Horizontal Active:       1920 Pixels, 12.4696 usec; (line 32)
 Horizontal Front Porch:  48.0001 Pixels, 311.742 nsec; (line 32)
 Field Information:
  Field Duration:           2.5688e+06 Pixels, 1235 Lines, 16.6834 msec; (line 0
)
  Vertical Sync:            14560 Pixels, 7 Lines, 94.5615 usec; (line 0)
  Vertical Sync Pulse:      14592 Pixels, 7.01538 Lines, 94.7693 usec; (line 0)
  Vertical Back Porch:      52000 Pixels, 25 Lines, 337.72 usec; (line 7)
---
--- NOTE: Vertical Sync = 7
---       Vertical Back Borch = 25
---       So Total = 32
The adjusted (using recondas subtract 2 rule) .vfs file for Dell U2412M:
# cat 1920x1200_60-u2412m.vfs
/*
 what: video spec for Dell U2412M monitor using
         EDID information from: powerstrip (win) / get-edid (linux)

 note: vertical back porch - EDID = 26 but changed to 24 to compensate for vfc

 author: John Hartley
*/
General {
 FormatName = "1920x1200_60-U2412M";

 FieldsPerFrame          = 1;
 FramesPerSecond         = 59.94;
 TotalLinesPerFrame      = 1235;
 TotalPixelsPerLine      = 2080;
 ActiveLinesPerFrame     = 1200;
 ActivePixelsPerLine     = 1920;
}
Active Line {
 HorizontalBackPorch     = 80 pixels;
 HorizontalSync          = 32 pixels;
 HorizontalFrontPorch    = 48 pixels;
}
Field {
 Vertical Sync =
 {
  {
  Length = 1.0H;
  Low = 0.0 usec;
  }
  repeat 6          <<== vfc cacluations results in this being 7
  {
  Length = 1.0H;
  }
 }
 Initial Low;
 Vertical Back Porch =
 {
  {
  Length = 1.0H;
  High = HorizontalSync;
  }
  repeat 24            <<=== Subtract 2 (was 26)
  {
  Length = 1.0H;
  Low = 0.0 usec;
  High = HorizontalSync;
  }
 }
 Initial High;
 Active =
 {
 repeat 1200
  {
  Length = 1.0H;
  Low = 0.0 usec;
  High = HorizontalSync;
  }
 }
 Vertical Front Porch =
 {
 repeat 3
  {
  Length = 1.0H;
  Low = 0.0 usec;
  High = HorizontalSync;
  }
 }
}
#if 0
postprocess
{
dump edge;
}
#endif
Th impact of adjusting the Vertical Back Porch from 26 to 24 is compensated by the compiler calculation generating Vertical Sync = 7 and Vertical Back Porch = 25, so out of view lines total is 32 (as above, which is same as unadjusted total).
As the recondas "subtract 2" rule appears to be compensating for how the vfc does its line calculations and what is important appears to be that: Vertical Sync + Vertical Back Porch = correct total. So I decided to try: "subtract 1 from each" rule instead.
This result (using subtract by v sync & v back porch by 1 rule) is generation of .vfo which exactly matches the inputs:
# cat 1920x1200_60-u2412m.vfs
/*
 what: video spec for Dell U2412M monitor using
         EDID information from: powerstrip (win) / get-edid (linux)

 note: vertical back porch - EDID = 26 , changed to 25 to compensate for vfc
       vertical sync - EDID = 6 , changed to 5 to compensate for vfc

 author: John Hartley
*/
General {
 FormatName = "1920x1200_60-U2412M";

 FieldsPerFrame          = 1;
 FramesPerSecond         = 59.94;
 TotalLinesPerFrame      = 1235;
 TotalPixelsPerLine      = 2080;
 ActiveLinesPerFrame     = 1200;
 ActivePixelsPerLine     = 1920;
}
Active Line {
 HorizontalBackPorch     = 80 pixels;
 HorizontalSync          = 32 pixels;
 HorizontalFrontPorch    = 48 pixels;
}
Field {
 Vertical Sync =
 {
  {
  Length = 1.0H;
  Low = 0.0 usec;
  }
  repeat 5          <<== Subract 1 as vfc cacluation results in 6
  {
  Length = 1.0H;
  }
 }
 Initial Low;
 Vertical Back Porch =
 {
  {
  Length = 1.0H;
  High = HorizontalSync;
  }
  repeat 25            <<=== Subtract 1 (was 26)
  {
  Length = 1.0H;
  Low = 0.0 usec;
  High = HorizontalSync;
  }
 }
 Initial High;
 Active =
 {
 repeat 1200
  {
  Length = 1.0H;
  Low = 0.0 usec;
  High = HorizontalSync;
  }
 }
 Vertical Front Porch =
 {
 repeat 3
  {
  Length = 1.0H;
  Low = 0.0 usec;
  High = HorizontalSync;
  }
 }
}
#if 0
postprocess
{
dump edge;
}
#endif
And corresponding generated info file:
# cat 1920x1200_60-u2412m.info
1920x1200_60-u2412m.vfo:
 Total lines per frame:   1235
 Total pixels per line:   2080
 Active lines per frame:  1200
 Active pixels per line:  1920
 Frames per second:       59.94
 Fields per frame:        1
 Swaps per frame:         1
 Pixel clock:             153.974 MHz, period = 6.49461 nsec
 Hardware pixel rounding:  every 4 pixels
 Line analysis:
  Length:                 2080 Pixels, 1 Lines, 13.5088 usec; (line 0)
  Frequency:              74.0259 KHz, period = 13.5088 usec
 Horizontal Sync:         32 Pixels, 207.827 nsec; (line 32)
 Horizontal Back Porch:   80 Pixels, 519.569 nsec; (line 32)
 Horizontal Active:       1920 Pixels, 12.4696 usec; (line 32)
 Horizontal Front Porch:  48.0001 Pixels, 311.742 nsec; (line 32)
 Field Information:
  Field Duration:           2.5688e+06 Pixels, 1235 Lines, 16.6834 msec; (line 0)
  Vertical Sync:            12480 Pixels, 6 Lines, 81.0527 usec; (line 0)
  Vertical Sync Pulse:      12512 Pixels, 6.01538 Lines, 81.2605 usec; (line 0)
  Vertical Back Porch:      54080 Pixels, 26 Lines, 351.228 usec; (line 6)
  Vertical Active:          2.496e+06 Pixels, 1200 Lines, 16.2105 msec; (line 32)
  Vertical Front Porch:     6240 Pixels, 3 Lines, 40.5264 usec; (line 1232)
Summary:
I have tested the generated .vfo with InfiniteReality graphics (using both "subtract by 2" and "subtract by 1's" rules) and image quality as gone from unacceptable to excellent and the monitor always syncs correctly.
As "subtracing by 1's" the format more exactly matches the monitor EDID, I use this as preferred .vfo generation option.
NOTE #9: I have put .vfs and monitor edid dump on github.
NOTE #10: Once you have compiled your .vfs file copy the .vfo into the /usr/gfx/ucode/<GRAPHICS>/vof directory for you machine. For IR this is: /usr/gfx/ucode/KONA/dg4/vfo
InfiniteReality - HDGVO Testing
When I started to look at InfiniteReality graphics display options, I had a look at the various DG5 options and decicded to go with DG5-2/TVO as this provided two TDMS outputs and my initial thought was that I could directly connect a monitor to this vis DVI-D cable.
I have now done some. testing on this and it turns out that there are a couple of problems:
- Only 1920 x 1080i (interlaced) is supported - to verify the behavior I connected Monitor to one of the two DVI ports and it appears that it sends alternate scan lines across the two ports (see picture - with monitor reporting 1920x540 signal)
- No Mouse Cursor - there does not appear to be a visible mouse cursor with the HDGVO display, so it is not usable for UI access
Here is picture of the signal report when monitor is connected directly to first HDGVO (TDMS/DVI) port:
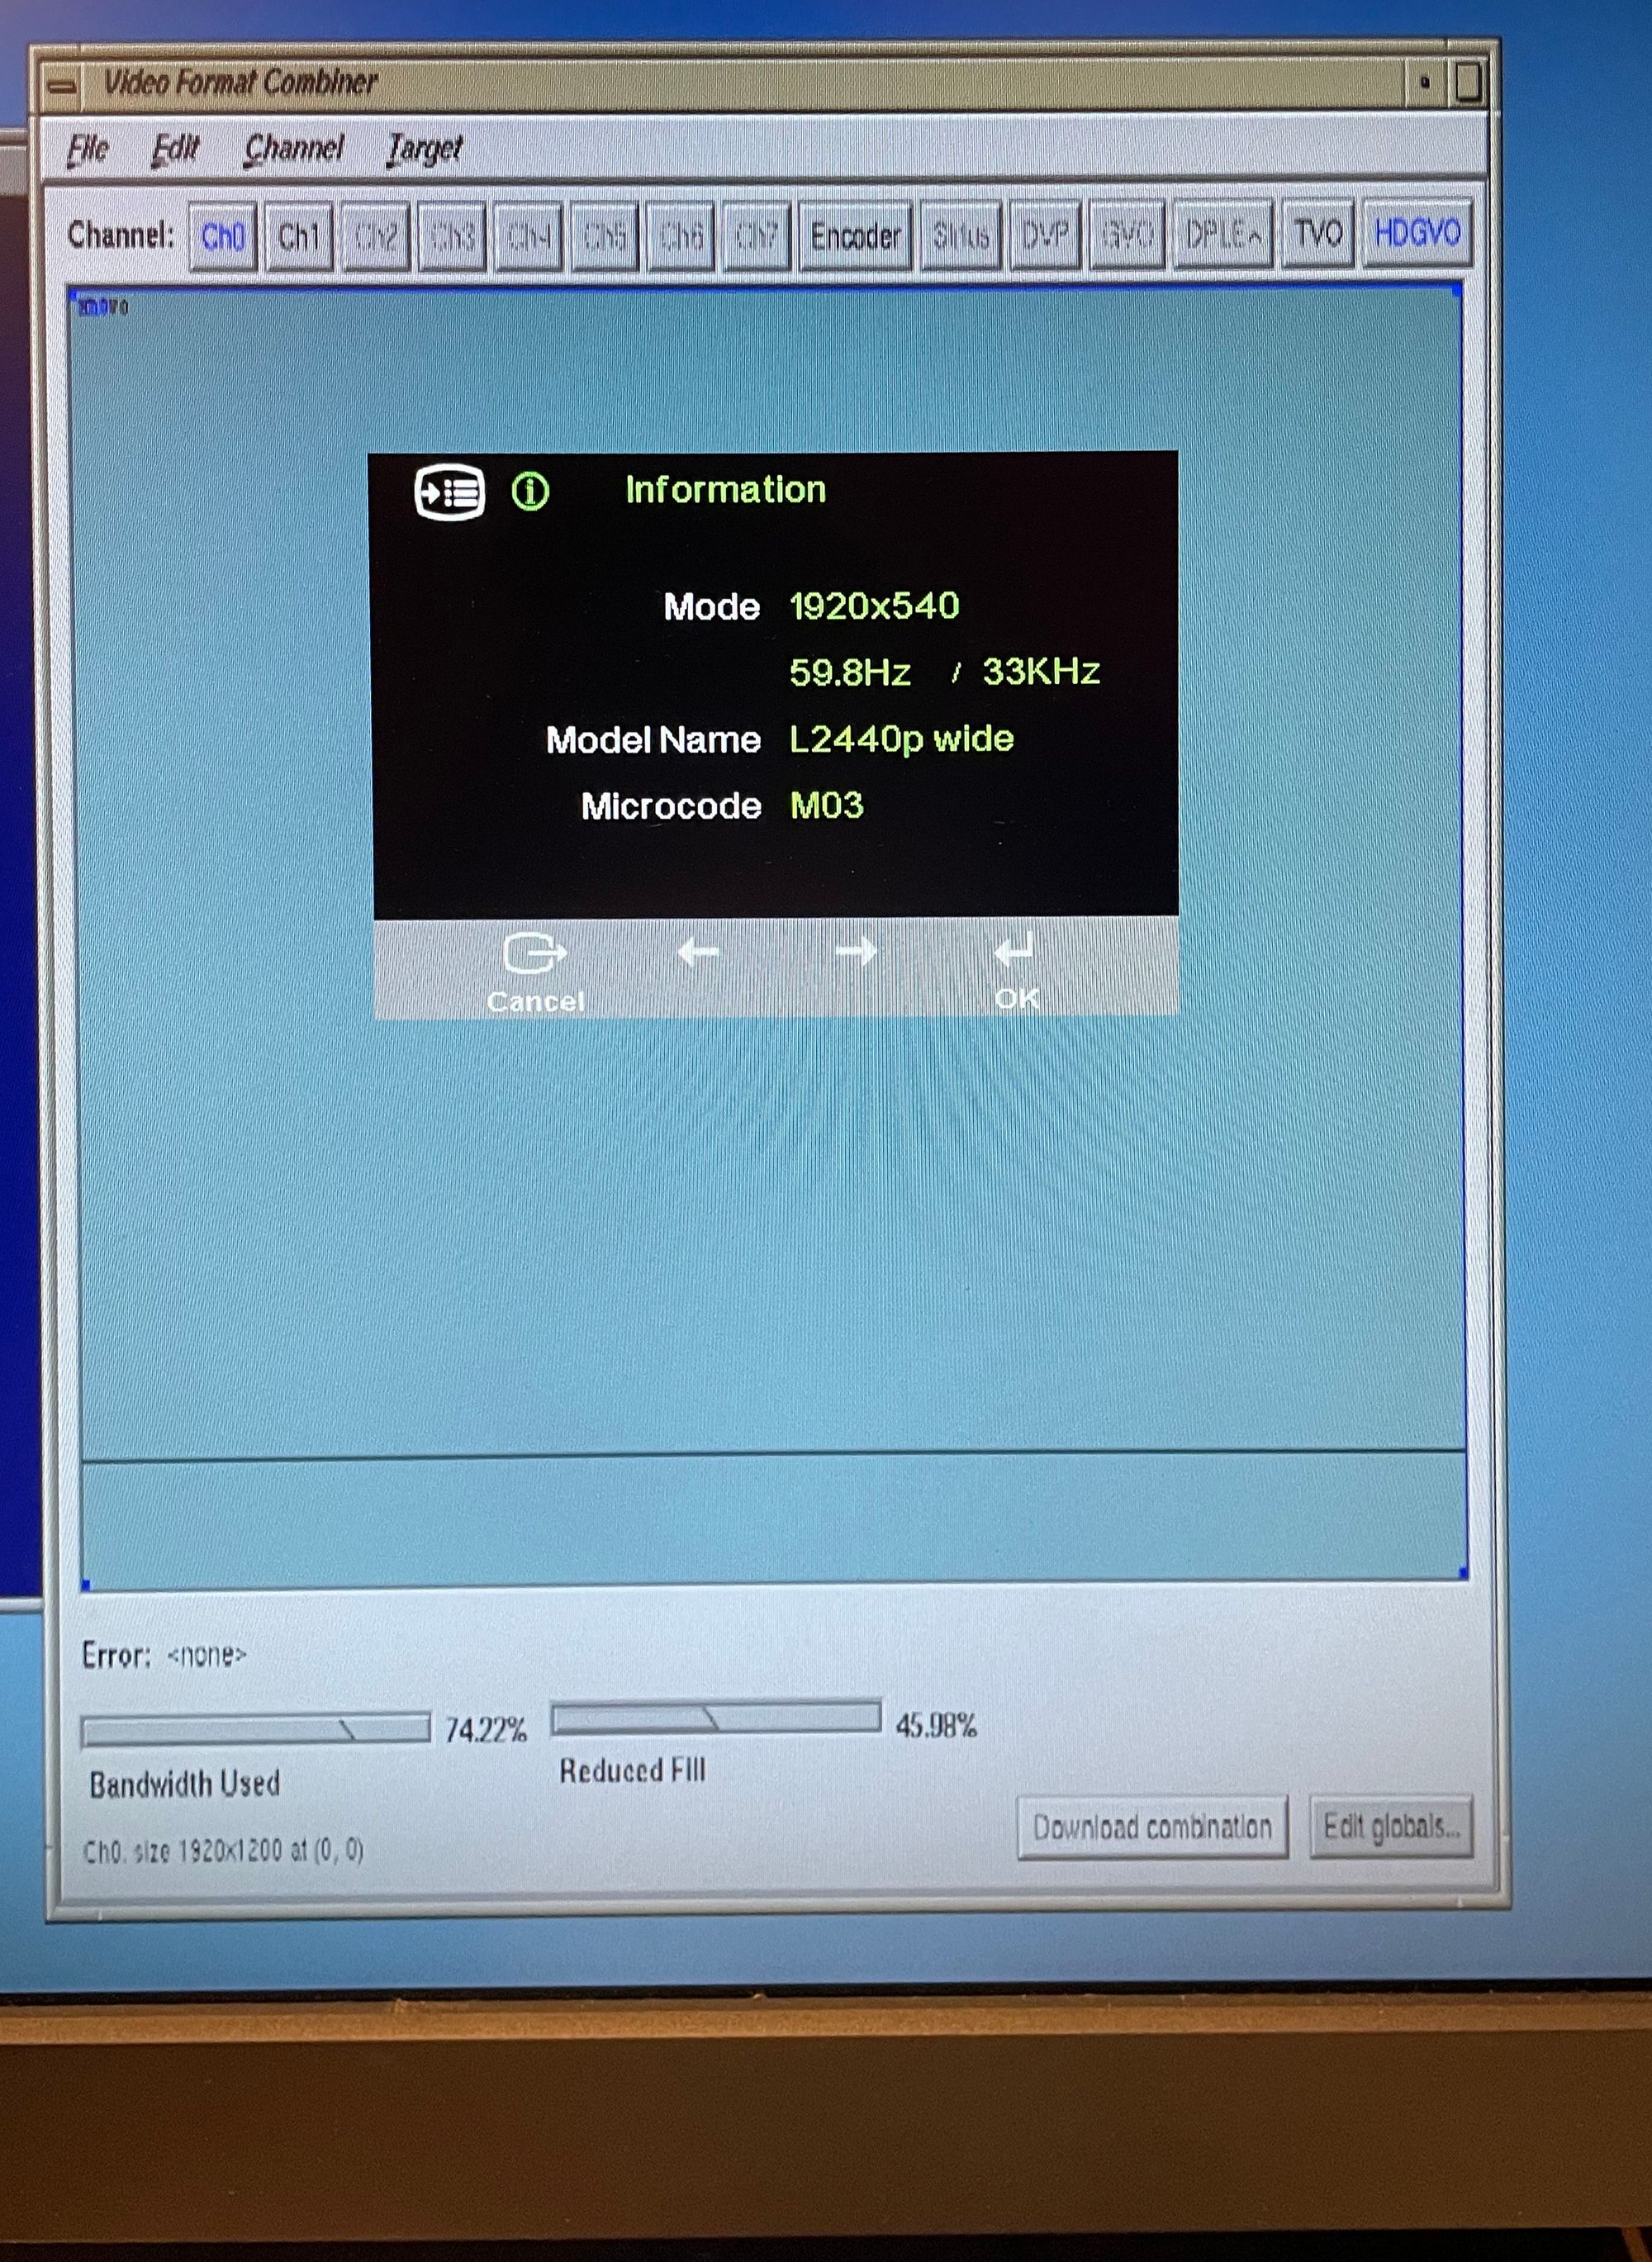
The two sets of interlaced 1920 x 540 outputs from the TDMS ports must then be combined into single HD SDI 1080i signal via the VBOB (Video Breakout Box).
So with InfiniteReality you cannot use the DG5-2/TVO to achieve full resolution digital output as per V12 with DCD on Octane or V12 with DVI output in O350 or Fuel.
I am also having issue where the main 1920 x 1200 @ 60 Hz screen is getting lost when the HDGVO .vfo is loaded. So while the two channels are supposed to be independent there is some interaction of the two.
NOTE #11: TVO == TDMS Video Out
Remote IRIX Desktop via MacOS
It is very simple to get remote X11 IRIX desktop with IRIX using XDMCP (X Display Manager Control Protocol). Be aware that this is not secure and so only suitable for use in priviate local network.
To enable this:
- enable the remote desktop in IRIX (In ToolChest - System -> Utilities -> Enable Remote Desktop)
- install MacOS XQuartz X Server & reboot your Mac
- On Mac open up Terminal window and connect to remote machine: "X -query MY.MACHINE.IP"
Enable / Disable IRIX Desktop
Most IRIX users are pretty samilar with the IRIX Desktop GUI. with its "Toolchest" visible in the top left corner of screen. This is typically installed by default and provides menus to manage Desktop, connect to Internet, Find things, manage System and get Help.
However this can be disable via "chkconfig" and you can end up with a much more spartan GUI.
If you find a IRIX system that does not have the expected Toolchest configuration then do a check of the "desktop": "chkconfig | grep desktop".
If this is "off" then the system will use a different default desktop startup file: "/usr/lib/X11/nodesktop.chestrc".
Normally it will use: "/usr/lib/X11/system.chestrc".
See "man toolchest" for more details.
Reading IRIX CD ROM on Ubuntu (Linux Box)
If you need to read an IRIX OS or other cd and do not have a CD/DVD drive connected to your SGI machine, here is simple workaround:
- Ensure you have xfsprog package installed (XFS == eXtensible File System)
- Copy the entire CD to an image file (using dd)
- Do a loop mount of image specifying type as efs (== extent file system)
# sudo apt install xfsprogs
# sudo dd if=/dev/cd0 of=irix-cd-01.img
# sudo mkdir /mnt/IRIXCD
# sudo mount -t efs -o ro,loop irix-cd-1.img /mnt/IRIXCD
# ls /mnt/IRIXCD
CDgrelnotes  CDrelnotes  dist  installtools  relnotes  stand  WhatsNew
NOTES #12: Why efs rather than xfs type ?
- EFS preceeded XFS and all SGI OS cds, have been formatted as EFS to allow booting by older machines
NOTE #13: What about RedHat ?
- SGI and RedHat co-developed the Linux EFS/XFS file system support so RedHat has XFS built in and uses it as default file-system (rather than ext4 like Ubuntu)
NOTE #14: The RedHat / SGI connection runs deep as SGI did a lot of porting to RedHat Linux, including the "Performance Co-Pilot" tool set
Old SGI IRIX comes with DatMan DAT Audio Player
Old SGI's where the only machine that was available that could play DAT Audio tapes. To do this you needed to have a DAT/DDS drive that had special SGI firmware.
There were two main tape drives that were available:
- Connor Archive - DAT/DDS-2
- Sony SDT-9000 - DAT/DDS-3 that came in two varieties, one with firmware version 12.2 and one with version 13.1 .
You can flash Sony SDT-9000 drives with SGI software. The tools for this include "Sony Tape Fireware Upgrade Utility. Here is version 1.1 of this that runs on Windows XP and there are more recent and even a linux version available if you do search. There is also a DOS based flashing tool that you ran from a boot floppy. This cames packaged with SDT-9000 12.2 firmware. To use this you also have to have the DOS ASPI drivers on the boot floppy with appropriate CONFIG.SYS loader file.
My Sony SDT-9000 is an original SGI version, with 13.1 firmware. Using IRIX scsicontrol you get:
/dev/scsi/sc1d1l0:  Tape          SONY    SDT-9000        13.1
ANSI vers 2, ISO ver: 0, ECMA ver: 0; supports:  synch
Device is  not ready
The 13.1 firmware used to be available from http://forums.rpc1.org but this site is now long gone and unfortunately I seem to have lost my version...
NOTE #15: Having looked at my SDT-9000, I saw that it is an original SGI part with F/W 13.1 clearly stamped on it. I will see if I can use SCSI tool to extract firmware in non-distructive way.
Network Setup on IRIX
The following files are used to set the main IRIX (6.5) network configuration:
- /etc/sys_id - the host name (not qualified) such as "frog"
- /etc/hosts - the more complete host name and IP address, ensure you have line such as: "XXX.XXX.XXX.XXX. frog.MYDOMAIN.COM frog" (also check that localhost is defined (127.0.0.1)
- /var/yp/ypdomain - this has the "yellow" pages domain name and even if you do not turn off yp, it is used indirectly by the sgi_apache configure script, which calls "/usr/bin/domainname" to get and configured domain (see "Locale and other IRIX configurations" below)
- /etc/config/netif.options - if you have mutltiple network cards and you want to change which is default then you will need to change the network interface / name configuration (typically required if you add a 1GbE or 10GbE card to your machine
- /etc/config/ifconfig-N.options - if you need to change the network mask (defaults to 255.255.255.0) or other interface specific options. Each interface needs it own file with N=1 provided and others needing to be created explicitly
- /etc/config/static-route.options - define the default (static route) with a line like: "$ROUTE $QUIET add net default XXX.XXX.XXX.XXX"
- /etc/resolv.conf - to configure your DNS resolution (as per other Unix platforms)
- /etc/nsswitch.conf - the network services switch file, make sure that the host line is using file, dns (and not yp - yellow pages, which is now obselete)
- /etc/config/proclaim.options - if you want to configure interfaces via DHCP. Note that you must have an ip address/host name entry in the "/etc/hosts" file for proclaim to correctly configure the interface
- /etc/ethers - provides mapping between MAC address and host name. To find MAC address of interfaces: "netstat -ian"
Locale and other IRIX configurations
IRIX shell and systems behaviour is strong affected by the Locale settings. Having incorrect Locale setting can result in strange behavior including:
- EZsetup Account - not working
- Infosearch - puts the wrong title on the Browser window
- Inforsearch - start fails
There are two primary environment variables that you need to make sure you have configured: TZ & LANG. The default configurations for these are in:
- /etc/TIMEZONE - look at /usr/lib/locale/TZ for the set of defined Time Zones or you can just create you own withing the TIMEZONE configuration file
- /etc/default/login - make sure that this has LANG=C or something else as otherwise EZsetup will not find language and location and so will automatically log out session
- /var/sgi_apache/httpd-outbox/etc/httpd.conf - is the Apache config file and Server name here will result in what is put on the Browser title page with Infosearch (web based help)
It is very very easy to break the sgi_apache configuration. This get automatically "adjusted" via /var/sgi_apache/sgi_config/configure script which get executed on startup. This startup scripts take the configured name, domain & ip address from the files:
"%%DOMAINNAME%%" - your domain suffix ie "vintage.computes.com"
"%%HOSTNAME%%" - your computer name ie "old-rusty"
"%%NETADDRESS%%" - your IP address ie 192.168.200.10"
The "/var/sgi_apache/sgi_config/configure" reads these as input and compares with the result from yp "/usr/bin/domainname" and "/usr/etc/configemail get mycanonname" and "/usr/etc/get localdomain" and then used sed to edit the httpd.conf files.
The script is very fragile and prone to f#$king up the configuration, which will become apparent when the infosearch web server starts to fail..
Solution is to get back the original httpd.conf scripts (likely to be the oldest backup of httpd.conf.bakXXXX on your machine, verify all the confguration items "%%XX%%" and /var/yp/ypdomain, /etc/sys_id, /etc/hosts and other network/host/domain naming files and then reboot.
IRIX Device ID Allocations & Serial Port Setup
IRIX generally does a good job of setup up your device configuration. However sometimes things can go a bit funny when you pull devices in and out of your system and the result is that the Device ID allocations change and your various configuration file that need to matches there for get broken.
Examples are ethernet interfaces, which by convention ussually start from 0 and are incremented sequentially (i.e. tg0, tg1, tg2, tg3 ... or ef0, ef1, ef2).
These interface names are then reference in various network startup scripts.
So what happens when these change unexpectedly ?
So what was previously tg1 & tg2 become tg3 & tg4.
You can either change the scipt that references then or you can reset the allocations which are managed via: /etc/ioconfig.conf
This is generated automatically during the hardware graph enumeration, here is an example of a large file from O350:
3 /hw/module/001c01/IXbrick/xtalk/15/pci-x/0/1/tty/1
4 /hw/module/001c01/IXbrick/xtalk/15/pci-x/0/1/tty/2
5 /hw/module/001c01/IXbrick/xtalk/15/pci-x/0/1/tty/3
6 /hw/module/001c01/IXbrick/xtalk/15/pci-x/0/1/tty/4
0 /hw/module/001c01/IXbrick/xtalk/15/pci-x/0/1/keyboard
0 /hw/module/001c01/IXbrick/xtalk/15/pci-x/0/1/mouse
1 /hw/module/001c01/IXbrick/xtalk/15/pci-x/1/1/mad_subsys
1 /hw/module/001c01/IXbrick/xtalk/15/pci-x/1/2/rad_subsys
0 /hw/module/001c02/IXbrick/xtalk/12/xtdigvid
7 /hw/module/001c02/IXbrick/xtalk/15/pci-x/0/1/tty/1
8 /hw/module/001c02/IXbrick/xtalk/15/pci-x/0/1/tty/2
9 /hw/module/001c02/IXbrick/xtalk/15/pci-x/0/1/tty/3
10 /hw/module/001c02/IXbrick/xtalk/15/pci-x/0/1/tty/4
3 /hw/module/001c02/IXbrick/xtalk/15/pci-x/0/1/scsi_ctlr/0
2 /hw/module/001c02/IXbrick/xtalk/15/pci-x/0/1/ei
4 /hw/module/001c02/IXbrick/xtalk/15/pci-x/0/3/scsi_ctlr/0
5 /hw/module/001c02/IXbrick/xtalk/15/pci-x/0/3/scsi_ctlr/1
1 /hw/module/001c02/IXbrick/xtalk/15/pci-x/0/4/tg
6 /hw/module/001c02/IXbrick/xtalk/15/pci-x/1/1a/scsi_ctlr/0
7 /hw/module/001c02/IXbrick/xtalk/15/pci-x/1/1b/scsi_ctlr/0
1 /hw/module/001c02/IXbrick/xtalk/15/pci-x/1/2/xframe
11 /hw/module/001c03/IXbrick/xtalk/15/pci-x/0/1/tty/1
12 /hw/module/001c03/IXbrick/xtalk/15/pci-x/0/1/tty/2
13 /hw/module/001c03/IXbrick/xtalk/15/pci-x/0/1/tty/3
14 /hw/module/001c03/IXbrick/xtalk/15/pci-x/0/1/tty/4
8 /hw/module/001c03/IXbrick/xtalk/15/pci-x/0/1/scsi_ctlr/0
3 /hw/module/001c03/IXbrick/xtalk/15/pci-x/0/1/ei
9 /hw/module/001c03/IXbrick/xtalk/15/pci-x/0/3/scsi_ctlr/0
10 /hw/module/001c03/IXbrick/xtalk/15/pci-x/0/3/scsi_ctlr/1
2 /hw/module/001c03/IXbrick/xtalk/15/pci-x/0/4/tg
15 /hw/module/001c03/IXbrick/xtalk/15/pci-x/1/1/tty/1
16 /hw/module/001c03/IXbrick/xtalk/15/pci-x/1/1/tty/2
11 /hw/module/001c03/IXbrick/xtalk/15/pci-x/1/2/ohci/0/scsi_ctlr/0
17 /hw/module/001c04/IXbrick/xtalk/15/pci-x/0/1/tty/1
18 /hw/module/001c04/IXbrick/xtalk/15/pci-x/0/1/tty/2
19 /hw/module/001c04/IXbrick/xtalk/15/pci-x/0/1/tty/3
20 /hw/module/001c04/IXbrick/xtalk/15/pci-x/0/1/tty/4
12 /hw/module/001c04/IXbrick/xtalk/15/pci-x/0/1/scsi_ctlr/0
4 /hw/module/001c04/IXbrick/xtalk/15/pci-x/0/1/ei
13 /hw/module/001c04/IXbrick/xtalk/15/pci-x/0/3/scsi_ctlr/0
14 /hw/module/001c04/IXbrick/xtalk/15/pci-x/0/3/scsi_ctlr/1
3 /hw/module/001c04/IXbrick/xtalk/15/pci-x/0/4/tg
21 /hw/module/001c05/IXbrick/xtalk/15/pci-x/0/1/tty/1
22 /hw/module/001c05/IXbrick/xtalk/15/pci-x/0/1/tty/2
23 /hw/module/001c05/IXbrick/xtalk/15/pci-x/0/1/tty/3
24 /hw/module/001c05/IXbrick/xtalk/15/pci-x/0/1/tty/4
15 /hw/module/001c05/IXbrick/xtalk/15/pci-x/0/1/scsi_ctlr/0
5 /hw/module/001c05/IXbrick/xtalk/15/pci-x/0/1/ei
16 /hw/module/001c05/IXbrick/xtalk/15/pci-x/0/3/scsi_ctlr/0
17 /hw/module/001c05/IXbrick/xtalk/15/pci-x/0/3/scsi_ctlr/1
4 /hw/module/001c05/IXbrick/xtalk/15/pci-x/0/4/tg
18 /hw/module/001c05/IXbrick/xtalk/15/pci-x/1/2/scsi_ctlr/0
25 /hw/module/001c07/IXbrick/xtalk/15/pci-x/0/1/tty/1
26 /hw/module/001c07/IXbrick/xtalk/15/pci-x/0/1/tty/2
27 /hw/module/001c07/IXbrick/xtalk/15/pci-x/0/1/tty/3
28 /hw/module/001c07/IXbrick/xtalk/15/pci-x/0/1/tty/4
19 /hw/module/001c07/IXbrick/xtalk/15/pci-x/0/1/scsi_ctlr/0
6 /hw/module/001c07/IXbrick/xtalk/15/pci-x/0/1/ei
20 /hw/module/001c07/IXbrick/xtalk/15/pci-x/0/3/scsi_ctlr/0
21 /hw/module/001c07/IXbrick/xtalk/15/pci-x/0/3/scsi_ctlr/1
5 /hw/module/001c07/IXbrick/xtalk/15/pci-x/0/4/tg
22 /hw/module/001c07/IXbrick/xtalk/15/pci-x/1/2/scsi_ctlr/0
The format is: <id> <hw-tree-device>
So that for a particular device type as as: tg where have:
- "1 /hw/module/001c02/IXbrick/xtalk/15/pci-x/0/4/tg" - this will be tg1
So if you want to change the device id then you need to edit the file and change the corresponding <id> numbers.
The <id> device numbers need to unique within a given device type family.
I have found that serial port ids are very prone to getting changed.
The serial port family are of type: tty
To get serial ports running correctly you will need to use the following configuration files"
- /etc/ioconfig.conf - the id allocations
- /etc//etc/inittab - to make the port available for use
- /etc/uucp/Devices - to configure the modem or direct connect behavior for port and the available speed it can connect with...
NOTE #16: I was forced to delve into this due to miss behavior of Fuel console port. See this thread on Irix Network
MIDI via SGI Serial Port
SGI of at least the Octane era have very versatile Serial ports that can be controlled via sofware to support:
- RS-232 - the default serial coms
- RS-422 - balanced serial comms that is basis for AppleTalk / LocalTalk networking
- AppleTalk - as SW on top of RS-422 and
- MIDI - again on top of RS-422
To support RS-422/AppleTalk/MIDI you will need to solder together special cable.
Traditional serial MIDI (1.0) used a DIN (European standard) plug that was totally foreign to computer communiations (though used extensively in audio applications) which used RS-232, DB9 (PC's) and mini DIN (Mac). So to connect a computer to MIDI the first thing you needed as either a special cable, a conversion unit or most likely both.
For my SGI Octane2 I leveraged a simple passive converter made by Opocode. The Opcode Translator Pro and cut open a Macintosh LocalTalk/Serial cable and wired it up with RS-422 / MIDI wiring compatible DB9. Here are the pictures of the MIDI interface parts for SGI setup:
If you are looking to use such a set up, read about connecting old Macintosh's to MIDI and this post on MIDI on O2 which was what I referred when setting up Octane over 10 years ago.
NOTE #17: Officially the DB9 is a DE-9, but it is ubquitously referred to as DB9 including in SGI documentation
NOTE #18: Do a "man serial" to get comprehensive of description of wiring and control of the SGI serial ports and how these vary across machines.
Using "Browservice" as Proxy for Modern Web via SGI / IRIX
One area of frustration for retro-computing is that the old Web browser is pretty much useless. A nice workaround is to use a proxy server than handles modern web broswer rendering and then passes result but to retro-browser as something they can use (jpgs or png bitmaps).
"Browservice" is one such solution that is simple to set up and use. To set it up you need to compile the proxy on Ubuntu server and the start up the proxy:
- Installation - for me went mostly without a hickup
- Running - the proxy I used guideance from "defaultrouteuk" via the YouTube he posted on his experience.
---
--- 1. Browservice Intall on Ubuntu, starting with pre-requisites
---
$ sudo apt install cmake g++ pkg-config libxcb1-dev libx11-dev libpoco-dev libjpeg-dev zlib1g-dev libpango1.0-dev libpangoft2-1.0-0 ttf-mscorefonts-installer xvfb xauth libatk-bridge2.0-0 libasound2 libgbm1 libxi6 libcups2 libnss3 libxcursor1 libxrandr2 libxcomposite1 libxss1
[sudo] password for USR:
Reading package lists... Done
Building dependency tree
Reading state information... Done
Package ttf-mscorefonts-installer is not available, but is referred to by another package.
This may mean that the package is missing, has been obsoleted, or
is only available from another source

E: Unable to locate package libpoco-dev
E: Package 'ttf-mscorefonts-installer' has no installation candidate
E: Unable to locate package xvfb

---
--- Install issues as per github guide for Ubuntu so
---     remove ttf-mscorefonts-installer and do manual install via
---     debian package
---

$ sudo apt remove ttf-mscorefonts-installer
$ wget https://www.nic.funet.fi/debian/pool/contrib/m/msttcorefonts/ttf-mscorefonts-installer_3.7_all.deb
$ sudo dpkg -i ttf-mscorefonts-installer_3.7_all.deb
Selecting previously unselected package ttf-mscorefonts-installer.
(Reading database ... 70776 files and directories currently installed.)
Preparing to unpack ttf-mscorefonts-installer_3.7_all.deb ...
Unpacking ttf-mscorefonts-installer (3.7) ...
dpkg: dependency problems prevent configuration of ttf-mscorefonts-installer:
 ttf-mscorefonts-installer depends on cabextract; however:
  Package cabextract is not installed.
 ttf-mscorefonts-installer depends on xfonts-utils; however:
  Package xfonts-utils is not installed.

dpkg: error processing package ttf-mscorefonts-installer (--install):
 dependency problems - leaving unconfigured
Errors were encountered while processing:
 ttf-mscorefonts-installer

 ---
 --- Now missing cabextract so install this
 ---   this was not found, so did apt update and then install.
 ---   Install failed again indicating need to do:
 ---    $ apt --fex-broken install
 ---
$ sudo apt install cabextrat
$ apt search cabextract
$ sudo apt update
$ sudo apt-get install cabextract
$ sudo apt --fix-broken install
$ sudo apt-get install cabextract

---
--- Now go back to debian install that failed
---

$ sudo dpkg -i ttf-mscorefonts-installer_3.7_all.deb

---
--- And back to pre-requistite install...
---

$ sudo apt install cmake g++ pkg-config libxcb1-dev libx11-dev libpoco-dev libjpeg-dev zlib1g-dev libpango1.0-dev libpangoft2-1.0-0 ttf-mscorefonts-installer xvfb xauth libatk-bridge2.0-0 libasound2 libgbm1 libxi6 libcups2 libnss3 libxcursor1 libxrandr2 libxcomposite1 libxss1

---
--- Prequisites installed so now clone repository and build
---

$ mkdir src
$ cd src
$ git clone https://github.com/ttalvitie/browservice.git
Cloning into 'browservice'...
remote: Enumerating objects: 24, done.
remote: Counting objects: 100% (24/24), done.
remote: Compressing objects: 100% (17/17), done.
remote: Total 1284 (delta 10), reused 15 (delta 7), pack-reused 1260
Receiving objects: 100% (1284/1284), 2.55 MiB | 1.28 MiB/s, done.
Resolving deltas: 100% (966/966), done.
$ cd browservice
$ ./download_cef.sh
$ ./setup_cef.sh
$ make -j5
$ sudo chown root:root release/bin/chrome-sandbox && sudo chmod 4755 release/bin/chrome-sandbox

---
--- All built so start the proxy.. on port 8080
---   with jpg generation
---

$ release/bin/browservice --http-listen-addr=0.0.0.0:8080 --use-dedicated-xvfb=YES --default-quality=100
Point your browser at proxy and you should get modern web via jpgs:
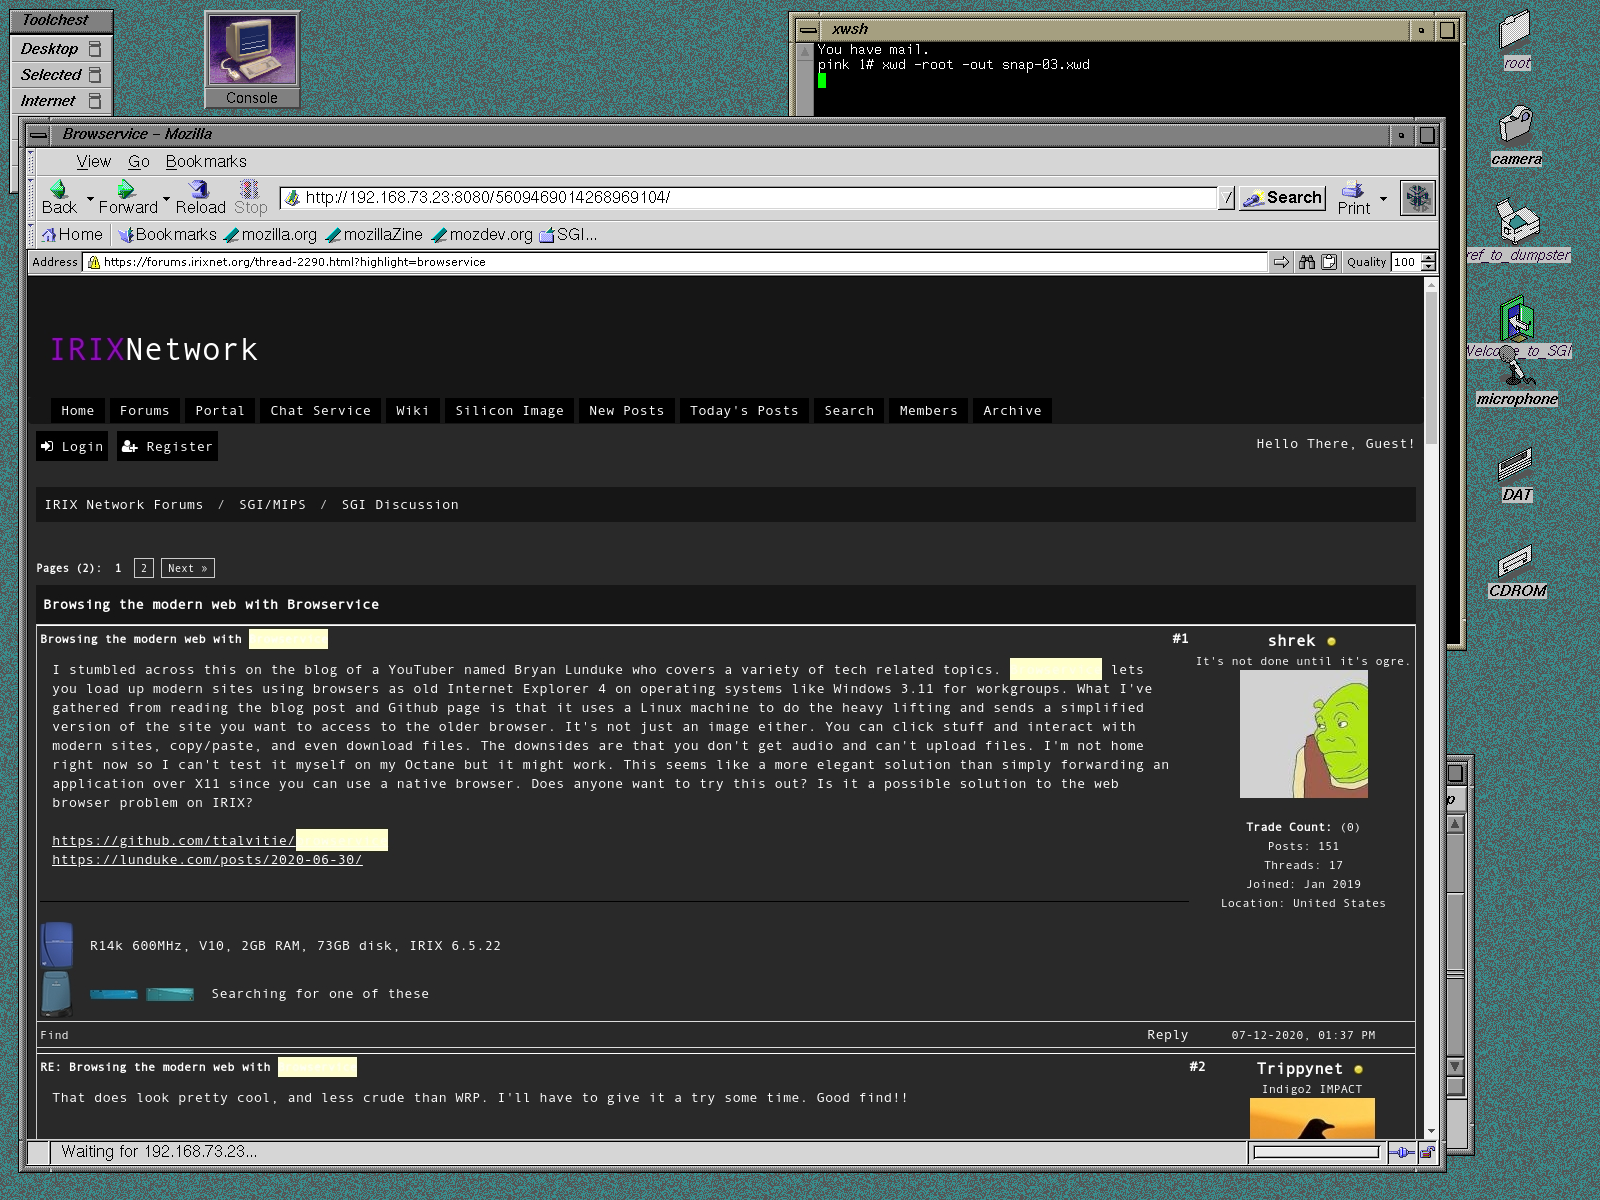
Thanks you "defaultrouteuk" I hope the packets get home ok ;-)
References & Links:
- Irix Network - working to take up hole left with demise of Nekchan, populated by many passionate and knowledgeable SGI users
- irix7.com - keep an archive of lots and lots of original SGI technical documents
- SGI Depot - keeps an archive of various sgi related materials and provides parts. run by Ian Mapleson one of the original sgi/irix community members and all round helpful person
- techpub.jurassic.nl - another SGI TechPubs archive, link and thanks for keeping this high quality document (via HTML and PDF), while irix7 above is PDFs
- Opcode Translator Pro - was a simple Macintosh targetted MIDI interface and can be used with correctly wired cable provide MIDI keyboard interface for Octane and other SGI machines that support MIDI via serial port. See the following site for various other retro-Mac MIDI stuff.
- MIDI on O2 - this page is the one that I referred to over 10 years ago when setting up MIDI on Octane
- EDID - Extended Display Identification Information defines a way that displays can describe there capabilities to video the video source machines
- PowerStrip - legacy Windows software that allows you to get and tweek video signal timing,
- XQuartz - MacOS X11 Server, recently updated to support Big Sur
- Past Echos the Future (Part II) - O350 / Chimera Stuff... - is where I have collected all the SGI Chimera mateial
- Web Archive (End of Archive links) - from original SGI web site product pages for the MIPS/IRIX machines: Tezro, Fuel, Origin 300, Onyx 300, Origin 350 and Onyx 350, Onyx4 and Orgin 3000. After which these products moved to the "Remarketed" pages.
- IRIX 6.5.30 Man Pages - which have been generated from IRIX catz pre-rendered man pages. To generate your own set here is code/scripts on github. This is just static pages at the moment, search and nice interface coming..
HINVs
hinv -mv (hardware inventory) is the start of understanding what your SGI machine is and what's inside it. Here are a couple of samples, starting with Tezro the last "Desktop" IRIX / MIPS SGI.
This type if data is simillar, but much easier to decipher than that you get from ipmi (BMC) interface.
The never changing hinv reports from my sgi machines... is here.
NOTES #19: Thanks to Mark Whithouse from Red Hat for invitation to "Performance Co-Pilot" birds of a feather session.
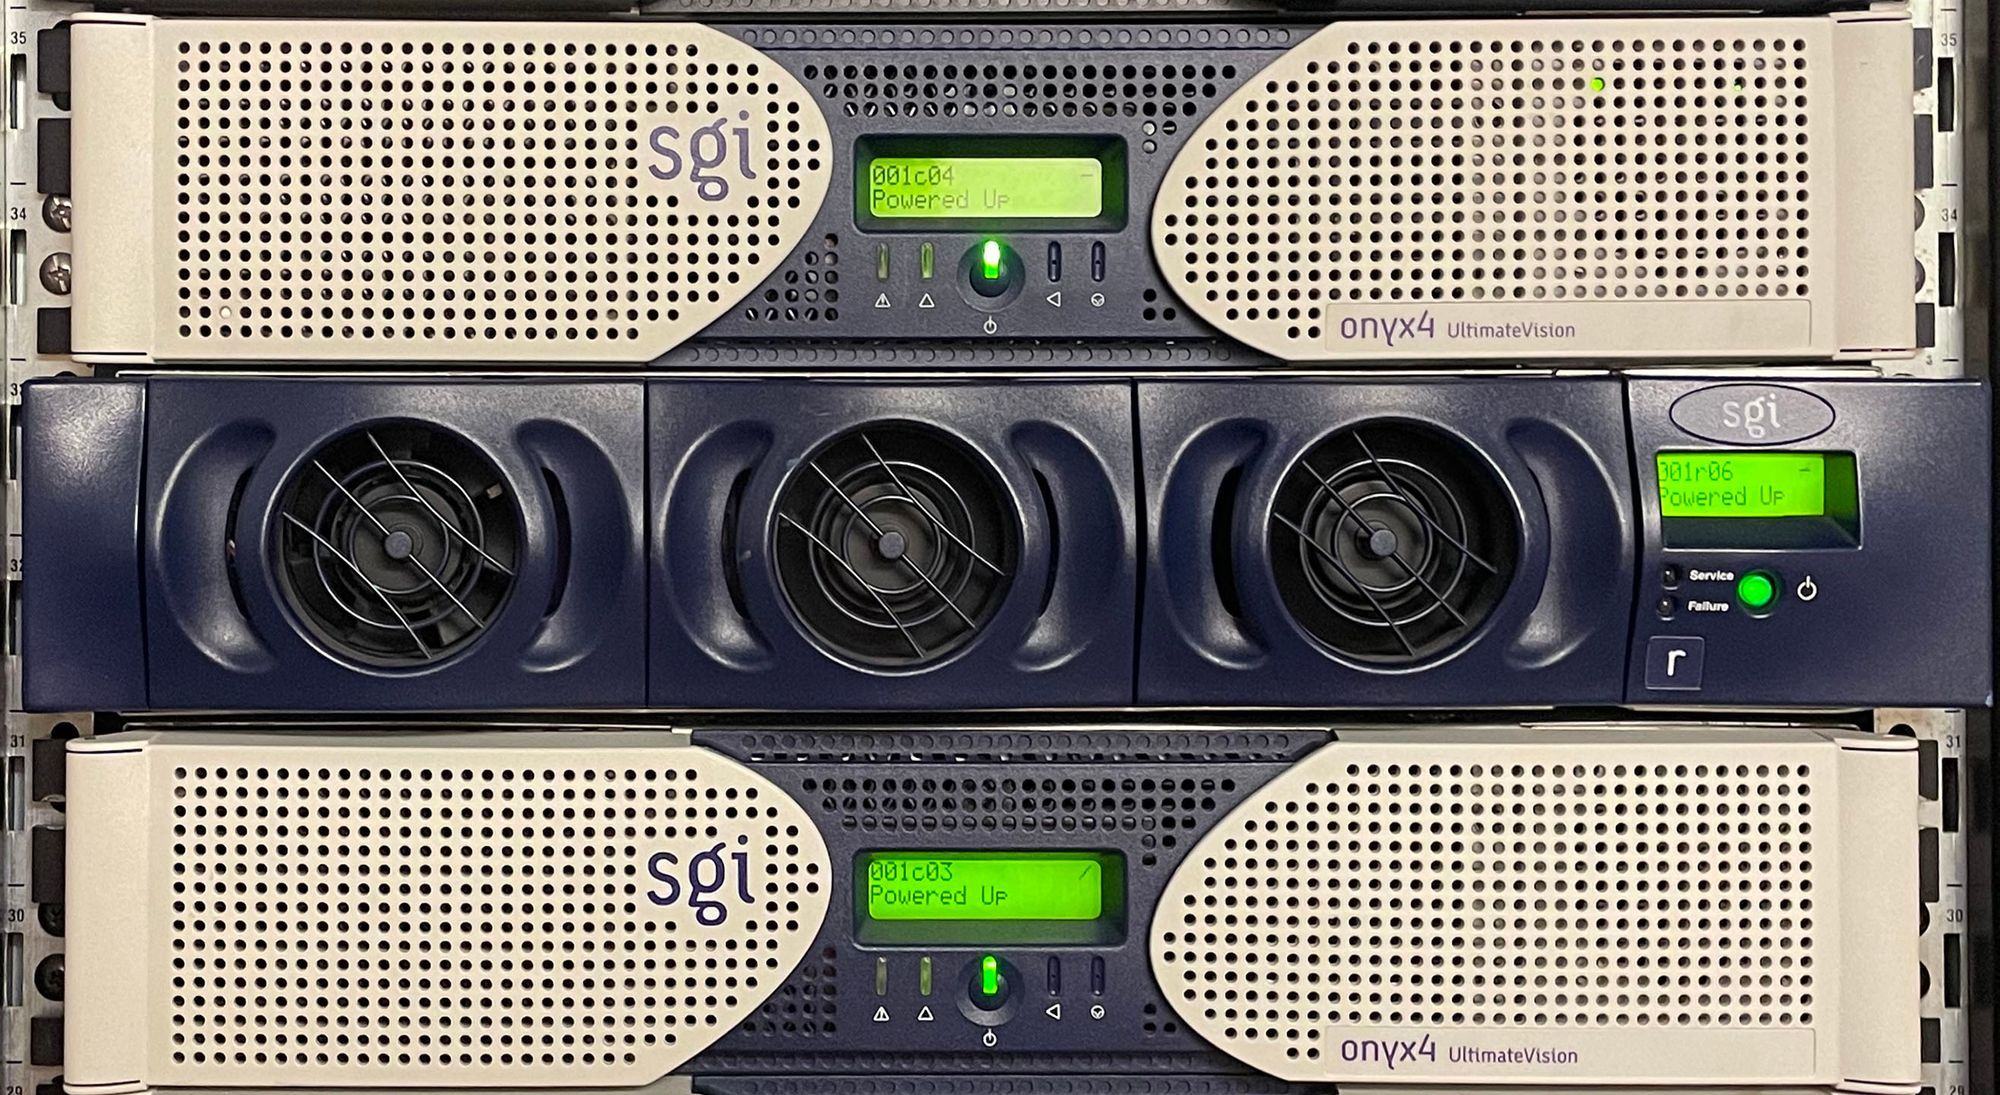
NOTES #20: Photo is of Numalink'ed Origin/Onyx O350.