
Ubuntu / KVM - MicroK8S + Harbor Deployment with LetsEncrypt

Status - in progress and testing
Kubernetes, Kubernetes and more Kubernetes ... that is what we are hearing at the moment. So if you are looking to write and deploy software into Cloud / Mist then being able to build and deploy this onto Kubernetes is an essential skill to learn.
The simple way to do this is via AWS, Google or other public Container-as-a-Service platform, but if you want to develop on locally deployed cluster then there are two approaches:
- Full Kubernetes Cluster - which is non-trival and requires quite a lot of hardware resources (3 machines minimum if you want a real HA K8S deployment)
- K8S Standalone Development Environment - this is what you need if you want small environment to deploy and test container based solutions in. The easy way to create this is with MicroK8S (for Kubernetes) with small Harbor registry for pushing your image to.
This blog provides notes and learnings on building MicroK8S on top of Ubuntu 19.04 KVM with Container Persistent Volumes and KVM based Harbor registry. This provides the essential components for Container building and testing.
NOTE: That this example is using 3 KVM machines, but I not giving any KVM / QEMU instructions, rather I am assuming reader know you how to setup VMs and how to install Ubuntu server.
I will refer to machines as:
- micro - the microk8s Kubernetes host
- harbor - the Harbor Registry host
- helm - the Helm host
Architecture View
Here is a very simple (just enough) architecture view of where this technical trial and validation is heading:
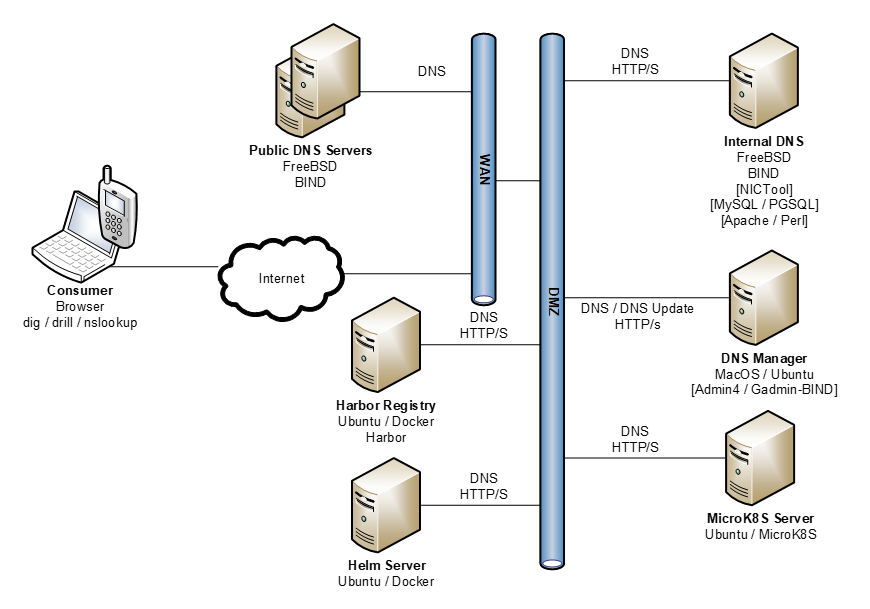
To promote having a proof that reflects a more substantive Kubernetes deployment, this model includes: Registry (Harbor) and Container Orchestration (Helm) and DNS infrastructure for LetsEncrypt certicates.
Easy Part - snap for microk8s
On micro:
- Install Ubuntu 19.04 Server
- Post install assign static IP address by updating netplan details in case where you used DHCP for initial install. Netplan configuration is in: /etc/netplan/50-cloud-init.yml. Once you have defined your configuration do "sudo netplan apply").
- Install microk8s via "snap":
sudo apt update
sudo apt upgrade
sudo reboot
... // log back in
sudo snap install microk8s --classic
sudo snap info microk8s     // to see version and details
More Complicated Part - Harbor install
Harbor is deployed as a container within Docker and so its installation requires: docker run time, compose (development env) and the Docker binary package. Once you have Docker and Compose installed you push Harbor on to stack. And there is some certificate stuff along the way.
I have looked at a number of description of the process and my set instructions try to use as many pre-built Ubuntu packages as possible. This is likely the most repeatable way (until it is all "snapped"). Many of the examples assume use of self signed certificates, for my example I will use LetsEncrypt certificates. This adds a little compexity as the automatic "certbot" process requires that you have publicly exposed IP address for the certificate process. In my example the private registry is behind a NAT'ing firewall and I have set up port forwarding from firewall to my target Harbor Registry machines.
Steps for installation, on harbor:
- Install another Ubuntu 19.04 Server (as above) and setup your static IP address.
- Install Docker Runtime, Compose and get your harbor offline install package:
sudo apt update
sudo apt upgrade
sudo reboot
... // log back in
sudo apt install docker.io // Docker Linux Runtime Package
sudo usermod -aG docker $USER // Add yourself into docker group
sudo reboot // reboot or log in/out to get group enrollment
... // log back in
sudo apt install docker-compose
docker info // should now have an empty docker host
... // get harbor, see: https://github.com/goharbor/harbor/releases
... // you want to get "Harbor offline installer", so copy link
mkdir <MYPLACE>
cd <MYPLACE>
wget https://storage.googleapis.com/harbor-releases/release-1.9.0/harbor-offline-installer-v1.9.0.tgz
zcat harbor-offline-installer-v1.9.0.tgz | tar xvf -
NOTE #1: Go here to get current installers: https://github.com/goharbor/harbor/releases
3. Get your certificate via letsencrypt. I did this via Apache install, but there is equivalent nginx approach (see refs):
sudo apt install apache2  // install apache
sudo apt install certbot python-certbot-apache // and certbot plugin
... // Test with browser ... I then choose to remove provided default
... // web page. Also by default installation has "+Indexes" enabled,
... // so I turned this off ("-Indexes")
cd /var/www
sudo mkdir default
sudo mv html/index.html default
sudo mkdir html/.well-known    // probably don't need to do this...
... // turn off "-Indexes"
sudo vi /etc/apache2/apache2.conf  // to change Indices behavior
sudo systemctl restart apache2
... // Run certbot option to install apache plugin and renewal timer
sudo certbot --apache  // asks if you want to enable https redirect
... // If your machine is accessible from inet you should be ready
... // certbot failure due to likely firewall config issue
NOTE #2: There is a good reason for using LetsEncypt certificates and that is that you don't have to worry about setting up trust for the CA with Kubernetes or worker nodes as these already have root certificate for letsencrypt root certificate pre-install with the OS. If you want to avoid exposing new web server for each certificate you can configure LetsEncrypt DNS based validation.
4. Now get harbor going using certificates from letsencrypt. First return to your harbor install directory from step 2 above and edit harbor.yml (YAML) file. The YAML file is in gzip/tar archive, and update needs to points to certificates / key from letsencrypt. The standard place where these can be found (on Ubuntu install) is: /etc/letsencrypt/live/<your machine>/cert.pem & /etc/letsencrypt/live/<your machine>/privkey.pem. See below for example harbor.yml (this is the first thirty line of provided default options):
# Configuration file of Harbor

# The IP address or hostname to access admin UI and registry service.
# DO NOT use localhost or 127.0.0.1, because Harbor needs to be accessed by external clients.
hostname: <THIS MACHINE>

# http related config
http:
  # port for http, default is 80. If https enabled, this port will redirect to https port
  port: 8080

# https related config
https:
#   # https port for harbor, default is 443
  port: 8443
#   # The path of cert and key files for nginx
  certificate: /etc/letsencrypt/live/<THIS MACHINE>/cert.pem
  private_key: /etc/letsencrypt/live/<THIS MACHINE>/privkey.pem

# Uncomment external_url if you want to enable external proxy
# And when it enabled the hostname will no longer used
  external_url: https://<FIREWALL MACHINE>:8443

# The initial password of Harbor admin
# It only works in first time to install harbor
# Remember Change the admin password from UI after launching Harbor.
harbor_admin_password: BIGSECRET

# Harbor DB configuration
database:
  # The password for the root user of Harbor DB. Change this before any production use.
  password: ANOTHERSECRET
NOTE #3: In my scenario where I put Apache on port 80/443 for Letsencrypt, I had to bump Harbor ports to 8080 / 8443 to avoid clash . The suggested alternate ports are as provided by Harbor default. Using harbor specific port is helpful with network/firewall configuration. As my machine is behind NAT'ing firewall I completed the "external_url" so it pointed to firewall machine (which is doing port forwarding). Having "external_url" configuration is important as it means that any JavaScript within payload will use this address rather than the machine address it is running on.
NOTE #4: Harbor default configuration uses 8443, which is already used by Apple iCAL Server - CalDAV with https, so you might have to select an alternate port.
5. Now startup Harbor registry via provided shell script...
sudo ./install.sh --with-clair
docker info
...
... // if something went wrong and you need to redo your install then
... // you can stop Harbor and delete images as follows
...
sudo docker-compose -f docker-compose.yml stop  // from harbor install dir
sudo docker rm $(docker ps -a -q)
Remote kubectl to your micro8s machine
Once you have k8s installed you can use kubectl as your management interface.
By default your microk8s will only allow be accessible via local machine. If you want to access your micro k8s server remotely then you will need to:
- Configure microk8s server machine and setup DNS entry for this machine
- Install kubectl on your remote machine
- Configure kubectl configuration on remote machine
- Test it
The various configuration files and updates are as follows (with machine "remote" being your client machine:
On micro:
Enable RBAC & DNS on microk8s:
$ microk8s enable rbac
$ microk8s enable dns

--- Now endit the microk8s DNS forwarder configuration to point to
---  your DNS server where: MICRO.MYDOMAIN.COM will be resolved as
---  per DNS.6 = .... entry below
---
$ microk8s kubectl -n kube-system edit configmap/coredns
Edit "/var/snap/microk8s/current/certs/csr.conf.template" by adding the DNS host hame of your microk8s server into [alt_names] section:
[ alt_names ]
DNS.1 = kubernetes
DNS.2 = kubernetes.default
DNS.3 = kubernetes.default.svc
DNS.4 = kubernetes.default.svc.cluster
DNS.5 = kubernetes.default.svc.cluster.local
DNS.6 = MICRO.MYDOMAIN.COM
Edit "/var/snap/microk8s/current/credentials/client.conf" and change cluster section host from: "server: https://127.0.0.1:16443" to: "server:https://MICRO.MYDOMAIN.COM:16443" (as per above "DNS.6 = ..." record
Restart your your microk8s machine
On remote:
First ssh into micro and get the certificate key and login credentials:
$ microk8s kubectl config view --raw
apiVersion: v1
clusters:
- cluster:
    certificate-authority-data: LS0
    ....
    ....
    LS0K
    server: https://MICRO.MYDOMAIN.COM:16443
  name: microk8s-cluster
contexts:
- context:
    cluster: microk8s-cluster
    user: admin
  name: microk8s
current-context: microk8s
kind: Config
preferences: {}
users:
- name: admin
  user:
    password: XXXXXXXXXXXXXXXXXXXXXXXX
    username: admin
You can either re-direct above output to file and ftp it, pipe it into a rcp or just cut and paste it into new file on "remote". The configuration contents need to be copied to "~/kube/control".
Now on "remote" can you check if you can access the microk8s machine, but doing: "kubectl cluster-info dump"
NOTE: If you get errors when doing remote test:
$ kubectl cluster-info dump
Unable to connect to the server: x509: certificate is valid for kubernetes, kubernetes.default, kubernetes.default.svc, kubernetes.default.svc.cluster, kubernetes.default.svc.cluster.local, not MICRO.MYDOMAIN.COM

---
--- Likely indicates that you have not correctly updated:
--- /var/snap/microk8s/current/certs/csr.conf.template

$ kubectl cluster-info dump
The connection to the server MICRO.MYDOMAIN.COM:16443 was refused - did you specify the right host or port?

--- Likely indicates you have not correctly updated:
--- /var/snap/microk8s/current/credentials/client.conf
---
NOTE: See "Authentication & Authorisation" documentation here for extra information.
Use Harbor registry with microk8s
We are now ready to use the registry with microk8s.
On harbor:
On micro:
Other ways and loose ends ...
The steps outlined here is one way of getting Harbor up and running. An alternate way would be to do this via a Helm chart. Another possibility is to have the LetsEncrypt certificate process be managed within Docker and finally have got a certificate you will need to establish a renewal process as Letencrypt certificate expire every 3 months.
References and Links:
- Install the Docker Harbor Registry Server on Ubuntu 18.04 - good tutorial and reflects using package, but not for compose and uses self-signed certificates
- Harbor GitHub - go here for your release packages
- Ubuntu Certbot Installation - get you your letsencrypt certificates
- How to Set Up a Private Docker Registry on Ubuntu 14.04 - Out of date and not specific to Harbor, but helpful to understand Docker Compose configuration and descriptors
- How to install and use VMware Harbor private registry with Kubernetes - lots of VMWare specific details but the only easy to follow set of instructions I could find when I started this (20 August 2018)
- A Diversion to DNS, DHCP, Certificates & Private Addresses - my notes on getting DNS management including DNS-01 validation with LetEncrypt going
- Install Helm - as useful set of info on Helm, Harbor and Kubernetes (in this case Harbor is installed on Kubernetes rather than straight Docker runtime)