
Apple Mac Pro (Mid 2012) to Mac Pro (2019) Upgrade & Migration Guide - Old Cheese Grater to newer Cheese Grater
Process to upgrade incompatible Mac Pro (Mid 2012) machine to Mac Pro (2019) machine using Virtual Machine intermediary.
Status: March 2024 - have source grater and target grater, need to start getting the "Grater Maker" up and running.
Status: March 2024 - testing steps to migrate ... and now completed, with this update being written on new Mac Pro 2019.
Like many other Apple Mac Pro users I passed on upgrading my "classic" Mac Pro (Mid 2012 / 5,1) "Cheese Grater" to a Mac Pro (2019 / 6,1) "Trash Can", due to the newer machine not having required extensibility (beyond lots of Thunderbolt ports).
I opted instead to continue to update my "Cheese Grater" and moved a lot of work to Mac Mini, MacBook Pro an
d using QEMU to run many of my virtualised Mac VMs.
The new Mac Pro 2019 "Cheese Grater" looked like a return to form, but the entry price for a machine with simillar grunt to my old Mid 2012 would have been about AUD $20,000, which I could not justify having moved much of the workload else where.
Now with the introduction of next edition of Apple Silicon Mac Pro 2023 and the as powerful but much cheaper Mac Studio, there has been a flood of Mac Pro Mid 2019 "Cheese Graters" on ebay and other markets.
I could not resist... time to upgrade from Mac Pro Mid 2012 to Mac Pro 2019. So what do I want?
Upgrade Expectations
What do I expect from upgrading my Mac Pro Mid 2012 "Cheese Grater" to new 2019 Mac Pro "Cheese Grater" ?
- Both Mac Pro's will be at the same macOS version
- The configuration of both machines will be the same.
- The same applications will be available across both machines
So in summary the new "Cheese Grater" experience will be the same as the old one, just a lost faster ;-) and supported.
Upgrade Reality
There has been a lot of macOS versions between the release of Mac Pro (Mid 2012) ("Mavericks") and Mac Pro (2019) (Catalina). Thats five releases between introductions. During this time the following "big" ticket compatibility hurdles come up:
- "Metal" based UI (Catalina) - Means that running Catalina requires compatible GPU
- T2 Security Chip - Means that the old process of simply cloning the hard disk using tools such us "Carbon Copy Cloner" is no longer possible.
On my Mac Pro (Mid 2012) one of the hardware updates I did was to install an Nvidia Titan X GPU. This is not "Metal" / "Catalina" compatible, so my Mid 2012 machine is running "High Sierra".
There are work arounds to the "Metal" issues including:
- Change the GPU
- Use "OpenCore" EFI boot utility, to load the right graphics drivers.
An alternate to upgrading the "Mid 2012", is to "downgrade" the 2019 machine to "Mojave" which was last macOS release officially supported for Mac Pro (Mid 2012). The problem is that "Mojave" does not have support for Mac Pro 2019.
So it looks like there is no smooth way to get both machines to have aligned macOS versions and easy migration, using the Apple Migration Assistant utility.
"Grater Maker" - Virtual Helper Machine
My approach to getting Mac Pro Mid 2012 to an aligned MacOS version and avoid having to start playing with OS "patchers" and boot relacements such as "OpenCore", was to:
- Clone Mac Pro (Mid 2012) machine to virtual machine
- Upgrade the helper "Grater Maker" virtual machine to target macOS version
- Either clone (unlikely due to T2 security) upgraded "Grater Maker" to Mac Pro 2019 or
- Restore the "Grater Maker" virtual machine to Mac Pro (2019) to target "Cheese Grater" via Time Machine backup using "Migration Assistant"
Hope was that this 0is simpler than physical machine based approach, relying on OpenCore.
Notes on doing migration ...
I attempted the migration process a couple of time to get it to work, as I stumbled across a few problems along the way.
My starting point was:
- macOS High Sierra
- source mahine with two SSDs, one with macOS and admin account and the other with user accounts
- The macOS SSD had only around 150GB usage, while the user accounts SSD was around 600GB usage.
- Most of the user disk is taken up with iTunes media files which have long since been moved to alternate machine
So steps to set up "Grater Maker" and migration process.
Step 1 - Physical Mac Pro (Mid 2012):
- Add 1TB SSD
- Consolidate the two physical disk on to single disk, using Carbon Copy Cloner, being careful to merge the "/Users" directories across two disks and not copy the iTunes library. For this to work I first cloned the boot disk and then restored user disk to a directory on cloned boot disk (not back to its original position), then via terminal did move (mv) and change owner/permissions (chown -R / chmod -R) of the user directories.
- Test that new cloned / consolidated disk is bootable and I you can log into each of the user accounts.
Step 2 - Physical Mac (Mid 2012)
- Ensure that VMWare Fusion is working ok on source machine (Mac Pro (Mid 2012)) and that "Grater Maker" Mac VM with has same macOS version as source "grater" (macOS High Sierra on Mac Pro (Mid 2012))
- Add new disk to "Grater Maker" Mac VM with enough space to hold the consolidated source machine disk/s contents
- Using Carbon Copy Cloner create an image of physical consolidated source disk (around 200GB in size) via a network connected drive
NOTE #1: I found after a number of trial and error tests that you cannot create disk image to either USB or internally connected disk, as it will not be openable via VM Machine in step 3. You must create the Disk Image on a network drive and restore from the same.
Step 3 - macOS Virtual Machine (Grater Maker)
- Boot virtual machine
- Restore Physical Machine disk image (from the network drive) to Virtual Machine additional virtual disk (this will became your "Grater Maker" boot disk).
NOTE #2: macOS / Carbon Copy Cloner is very sensitive to version of macOS that is being used to create and restore disk image and the "media" that is used. To get this to work I had to have both source physical and target virtual machines with same macOS version and use the same network shared disk for image write/read.
NOTE #3: On my source machine, I had a VM with macOS Sierra (not High Sierra). To get this up to High Sierra" I cloned the Sierra boot disk and then upgraded it to High Sierra. This provided me with virtual machine that was at the same macOS release as my source physical machine. I found that the upgrade process to High Sierra resulted in conversion of disk to "APFS". The result was that once clone completed the Sierra "Systems Preferences" Startup Disk selection did not recognise the disk as valid startup disk. So to boot from the right macOS, I ended up removing the "older" macOS disks from the VM to force it to boot the wanted "High Sierra" VM.
Step 4 - macOS Virtual Machine (Grater Maker)
- As new Mac Pro 2018 has much more disk space, cores and memory available, I elected to install VMWare Fusion on the new Mac Pro 2019 Catalina machine and copied the Virtual "Grater Maker" machine to this. This meant I had plenty of space available to copy new VM disk images for backup along the way and avoid having to redo all the intermediate steps, when the VM crashed or failed to upgrade.
- So with VM now on Mac Pro 2019, boot Virtual Machine off the restored source machine disk image disk (High Sierra)
- Change networking and machine names of source machine and new "Grater Maker" VM to avoid name / address conflicts as with VM running (with bridged network), as there are now two "identical" machines on the network.
- Download macOS version you aim to have as target machine starting level (I only got one further step from High Sierra to Mojave, due to Catalina crashing)
- Upgrade the macOS on "Grater Maker" to target machine macOS level. I started with Grater Maker at High Sierra and updated this to Mojave.
- Take "Time Machine" backup of "Grater Maker" helper virtual machine, via external USB Driver.
NOTE #4: I tried to upgrade Virtual Grater to Catalina, but this version of virtual machine kept crashing on reboot post upgrade. This is likely due to incompatable third party drivers (SmallTree, Areca RAID or Nvidia Web Drivers). I elected to handle the removal of these via the physical Mac Pro 2019 in "Step 5", than in this step.
Step 5 - Physical Machine (Mac Pro 2019)
- Starting with clean macOS install (Catalina), plug in USB Drive with Time Machine Backup from Step 4.
- Use "Migration Assistant" to pull configuration from source machine to new machine, electing go transfer everything and create a copy of old Mac Pro (Mid 2012) admin account with new user id as part of migration.
- The migration from Mojava worked successfully put also pulled across old Cataline incompatable drivers, including the Nvidia Web Drivers, so I got "need to upgrade" message on rebooting into new machine
- As "Migration Assistant" allows you to migrate from older macOS (Mojave) to newer macOS (Catalina), I had to manually remove the Nvidia (Titan X), SmallTree (10GbE) and Areca drivers on reboot.
- One of reason for moving to Intel Mac Pro 2010 and not new Apple Silicon machines was that I have lots of Windows (x86) VMs and I need PCIe slots for move Areca 1883 12Gbs SAS RAID card to new Mac Pro 2019. So migration included pulling out Areca 1883 PCIe card and adding to new Mac Pro 2019 and installing updated drivers.
Step 6 - Update new Mac Pro 2019 to Sonoma
- Final step was to do macOS update to Sonoma and VM Fusion 13 upgrade.
- I also consolidated all VMWare Fusion VMs across a number of machines and re-opened these to bring them into the Virtual Machine Library
NOTE #5: My Mac Pro (Mid 2012) High Sierra has macOS Server installed. This was withdrawn by Apple after Montery (by then it only include Profile Manager and Open Directory). By jumping to Sonoma rather then Montery, I elected to stop using the remnants of macOS Server.
Migration complete and old Cheese Grater, can now be retired.
Other things ...
In upgrading to new Mac Pro (2019), the were some other network and disk changes that had to be made along the way:
- Upgrade 2019 Mac Pro internal T2 connected SSD storage to 8TB
- Move Areca 1883 12Gbs SAS RAID controller from Mid 2012 Mac Pro machine to 2019 Mac Pro
- Change networking from SmallTree 10GbE to internal 10GbE
- Update macOS Server to current version
SSD Upgrade to 8TB
The Mac Pro 2019 has internal SSDs that are connected to T2 security chip. The results is that the upgrade requires:
- Physical SSD Swap and
- Apple Configuration re-configuration of SSDs with T2 security.
This required you have additional Mac to run the "Apple Configurator" on and USB-C cable to download updated configuration onto the new Mac. It also means that you cannot keep any data across SSD swaps and the security chip forces clearing of any data.
The instructions for this process are documented on Apple support: "Install or replace SSD modules in your Mac Pro (2019)".
The physical instructions will incorrectly provide you with link to Mac Pro 2023 install (choice Catalina as macOS option to get correct ones).
The firmware instructions have additional "Step 3" to revive the firmware. This failed, you should just use the "Step 4" to "Restore" the SSD.
Once SSD is "restored" you will need to do an "Internet Recovery" install to get macOS back on the machine.
Moving the Areca 1883 12Gbs SAS RAID Card
I have my Mac Pro connected to SAS RAID Array via Areca 1883 SAS RAID card. As Catalina requires "signed" drivers, the drivers pulled across via Migration Assistant need to be removed and new signed drivers installed.
These are availabe via Areca Support - Download Centre.
To remove I just deleted the Areca folder from "/Applications" directory then reboot and reinstall via downloaded installer.
SmallTree 10GbE Removal
My old Mac Pro (Mid 2012) had SmallTree NIC installed. As new Mac Pro 2019 has inbuilt 10GbE, I did not carry this over and manully remove the drivers.
macOS Server Retirement
My old MacPro (Mid 2012) used macOS Server for Time Machine servering and as DNS Cache. Sadly Apple has finally stopped supporting macOS Server.
While existing customer of macOS Server can continue to download this, it is not available for purchase anymore and does not run at all on Sonoma.
If I had of realised that macOS was not support on Sonoma I might have just upgraded to Monterey, but I only found this out when macOS Server crashed on running updated version.
As my main use was for "Time Machine" sharing and this has now moved into macOS, I can now accept and live with its retirement on latest macOS release. Like many things Apple sometimes you just have to accept their brutal approach to the march of technology.
Summary
Migration completed...
Are these really desktops ?
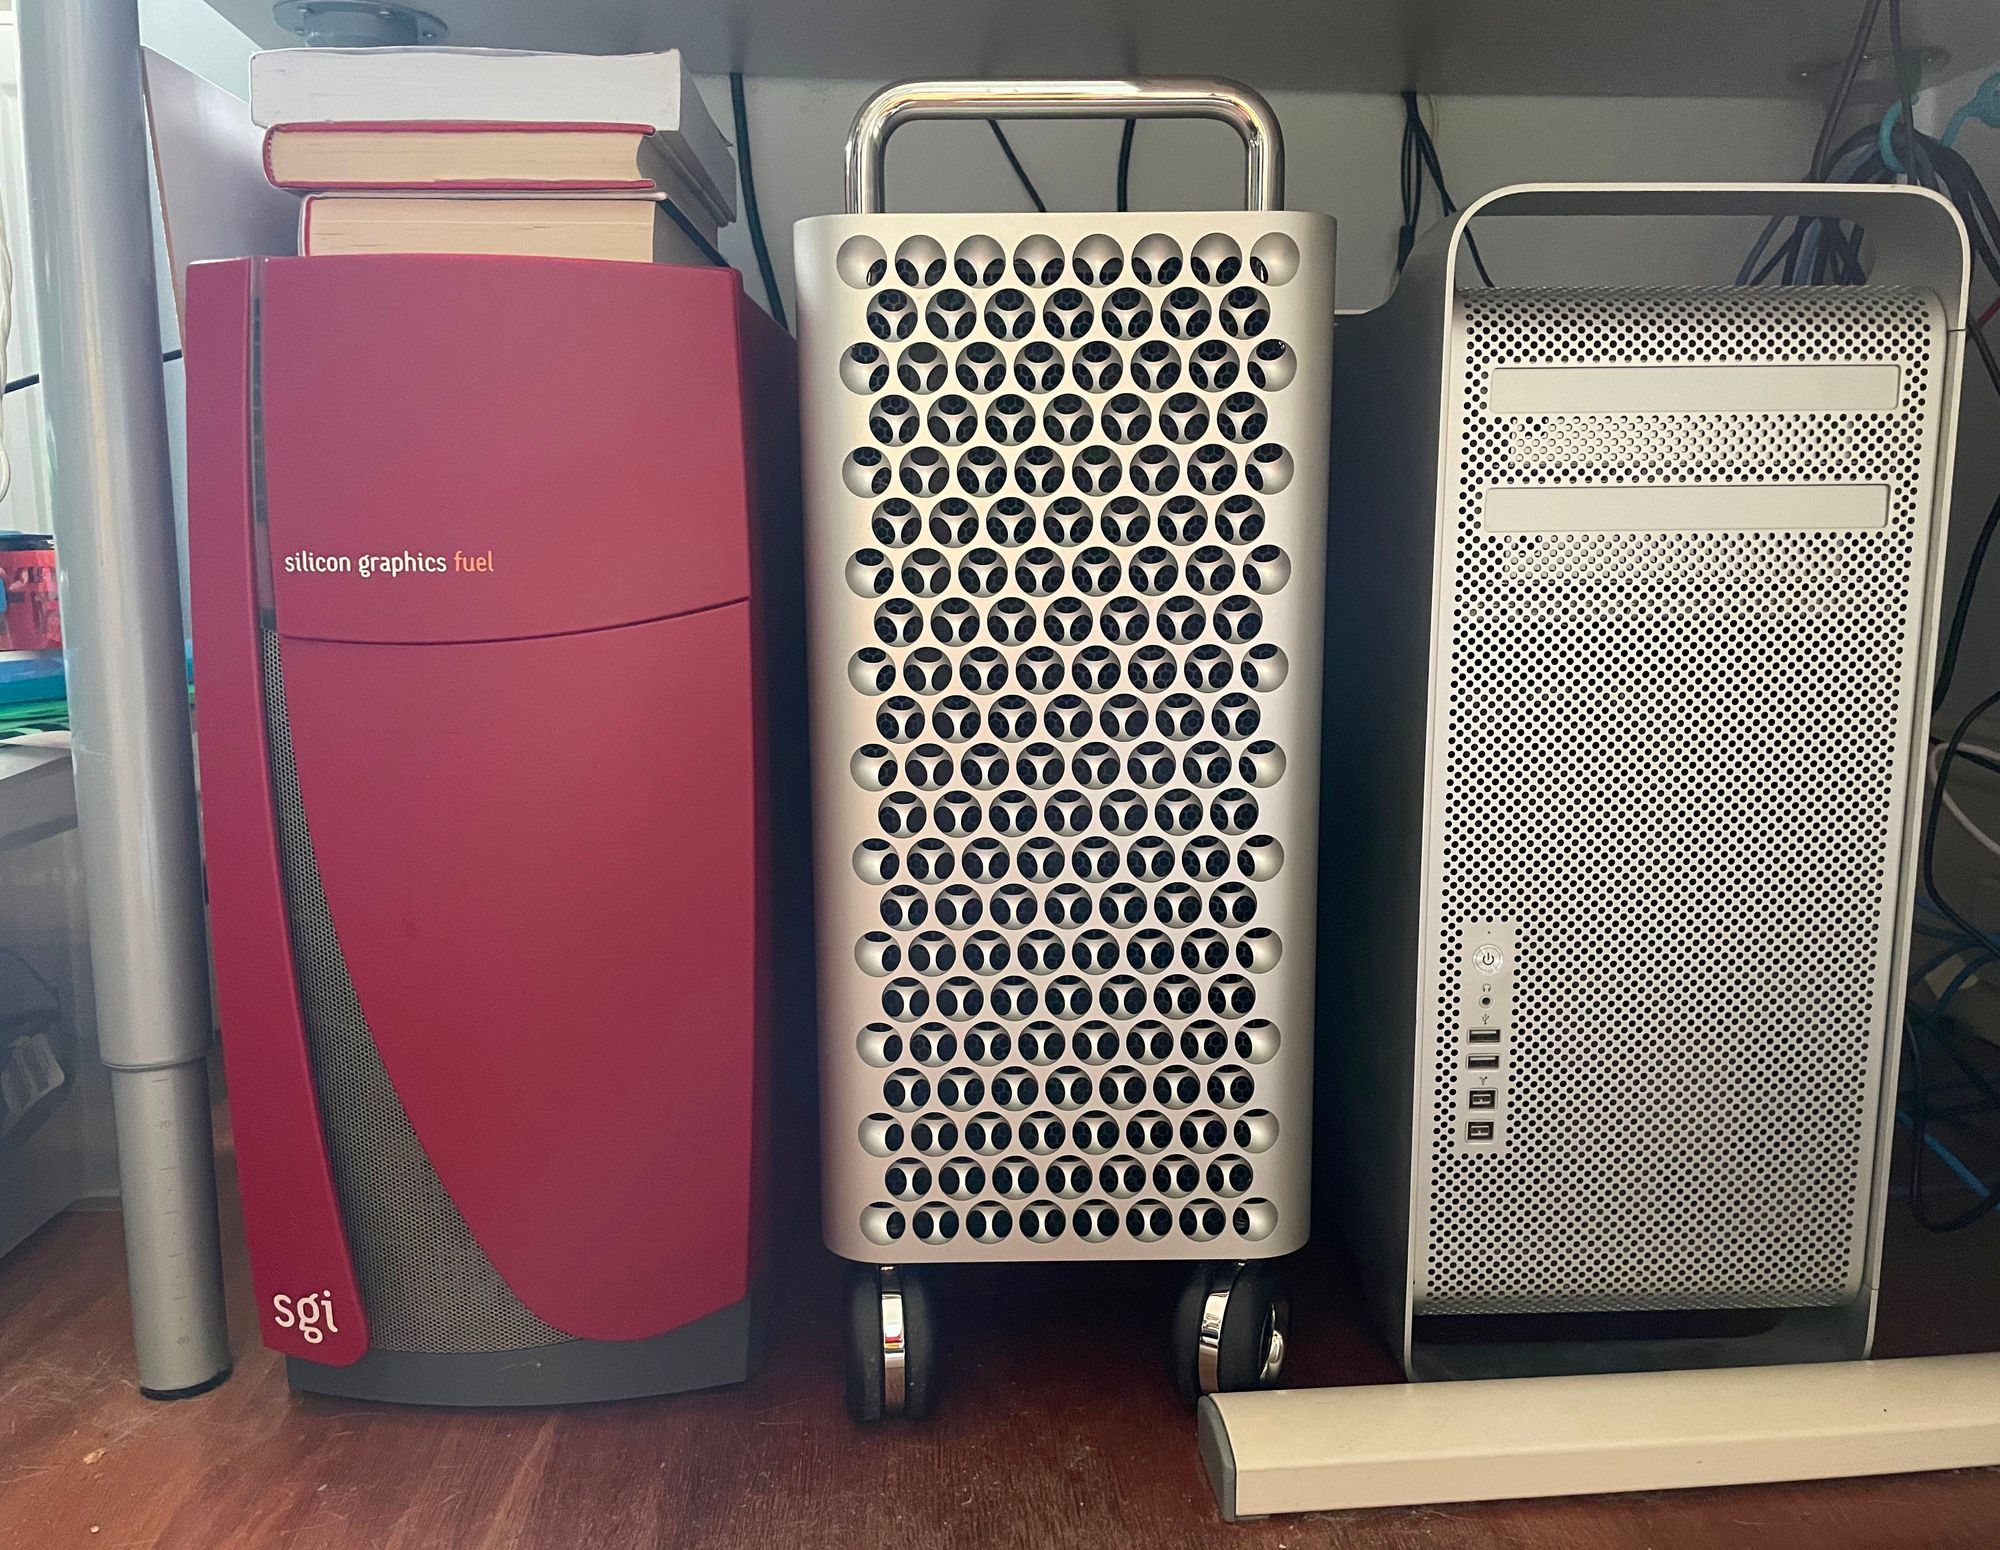
Mac Pro 2019 - Now top cat of "Desk Bottoms".
Migration was time consuming due to experimented with macOS upgrades and backups that was complicated by my not having a "Metal" compatible GPU and having to work around fast storage constraint. For all its PCIe expandability, not having inbuilt SATA/SAS internal storage on Mac Pro 2019 (and 2023 one) seems a bit limiting (Apple opted to provide this via Promise after sale option).
For simple migration, I believe that this could be streamlined by just doing the following four steps:
- Step 1 - Update source to Mojave (non Metal) or Catalina (Metal)
- Step 2 - Backup source to USB via Time Machine
- Step 3 - Start with clean Target at macOS Catalina
- Step 4 - Run Migration Assistant to bring across only configuration and data
So obselete Mac Pro 2019 or new Apple Silicon Mac Pro 2023 ?
For my use where I have large number of Intel VMs running on VMWare Fusion (I also have a bunch running on QEMU/KVM), Apple Silicon is not an option, as the software Intel solution by UTM based on QEMU is reported to be unstable. Not doubt this will be improved over time, but for now I have opted for Intel hardware with Fusion.
The value of Apple Silicon Mac Pro is really based on wheter you need PCIe slots, if not then Mac Studio is way better value. I need the PCIe slots to run Areca RAID SAS array, so need Mac Pro.
Risk with Mac Pro 2019 is that Apple will drop macOS support (as they did with Mac Pro 2012. Again for me I continued to use Mac Pro 2012 until I replaced it with Mac Pro 2019. So expect even with Apple dropping macOS support I will get a good ten years life out of it. Based on Geekbench scores you can see the historic growth in "grunt" from original Xserve, to Mac Pro 2012, to Lenovo X86_64 server to new Mac Pro 2019:
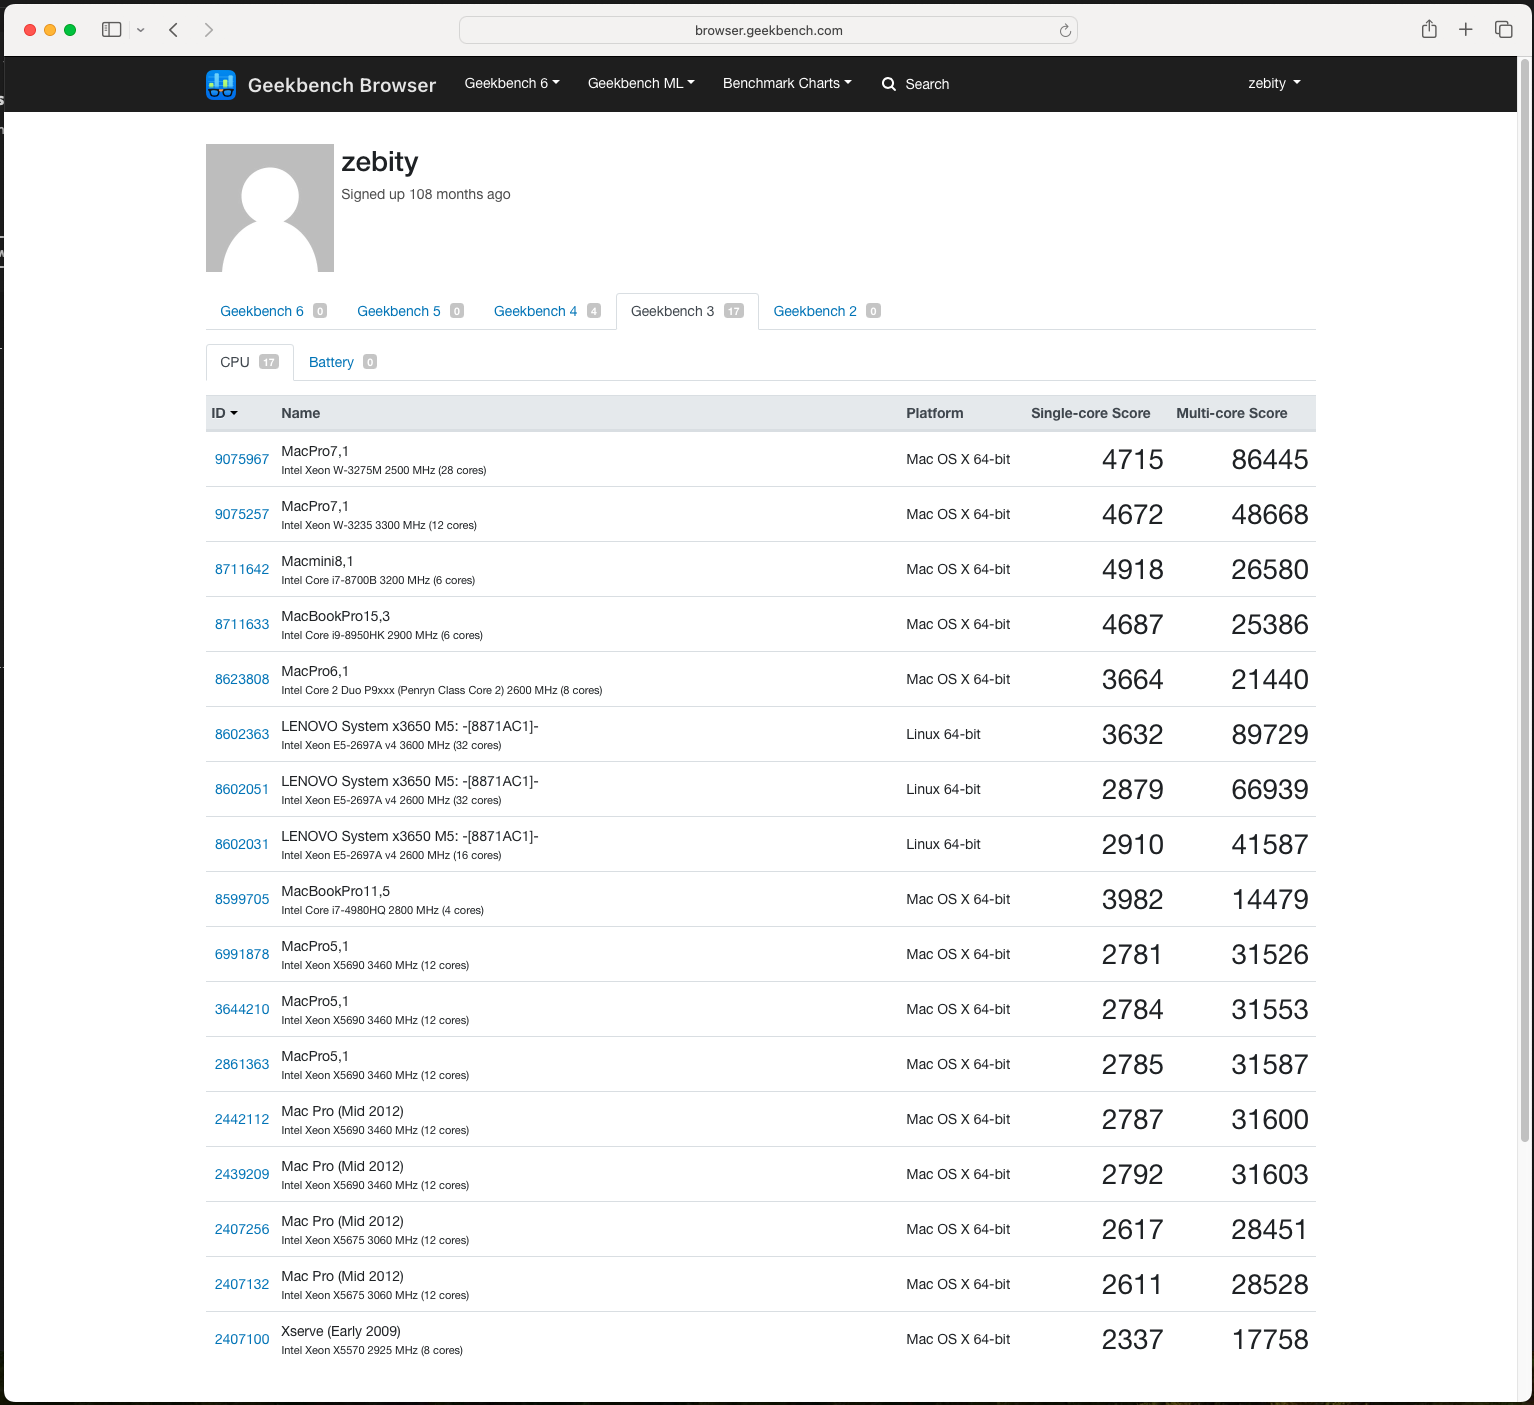
Note that little Mac Mini gets best single CPU score, while 32 core (2 x 16 core) server gets best aggregate score.
References & Links:
"The Definitive Classic Mac Pro (2006 - 2012) Upgrade Guide" - documents all the twists and turns on upgrading classic Mac Pros to new Mac Pro. The reason for all the complexity is that the approaches do not leverage "virtualisation" ;-)
"Mojave on Mac Pro 2019 ..." - another intrepid explorer trys to see if they can get Mac Pro 2019 up and running with pre 2019 Mojave MacOS. The result - the did not succeed.
Official Apple MacOS Catalina Compatibility - officially Catalina is not compatible with Mac Pro 2012. There are ways some of which include changing your GPU Adaptor. The complexity get to why there is the very extensive "Definitive Guide" above.
MacOS Version History - the MacOS releases, Mac Pro Mid 2012 was released around same time as "Mavericks" and Mac Pro 2019 was released with "Catalina"
"Carbon Copy Cloner" - a very useful MacOS disk cloning tool.
"OpenCore" - a UEFI BootLoader, which can be used to to control MacOS boot process
MacOS / Macintosh Compatability - this "Mac OS Compatability Guide" from OWC/MacSales pr0vide easy to use summary of Software/Hardware compatabilty
T2 Security Utility - "Everything You Need to Know About Apple T2 Security Ship Startup Security Utility" this article from MacSales blog was very helpful back when I had to get my first Mac with T2 up and running.
Hacking around with T2 - "No adminstrator was found" was an error I got when I tried to copy my old (non T2) Mac to T2 Mac via the old boot new Mac via old Mac using Target Disk Mode and then clone with Carbon Clone Copier. This article helped with addressing some of the restruction imposed with T2 Macs
Getting old macOS versions - this Apple support article, "How to download and install macOS" has links to all the downloadable (OS X / macOS versions). To migrate your old Mac Pro (2012) to new Mac Pro (2019), you will need to get your old source machine to Mojave and start you new machine with at least Catalina.
Migration Assistant and source/target macOS version - these Apple community articles discuss using Migration Assistant when source and target macOS versions are not the same: "Using Migration Assistant between High Sierra and Catalina" and "Migration assistant with different Os version".
Upgrading Mac Pro 2019 SSD - the details on physical update, pay attention to the need to push in the SSD cover to release the Blower shroud. As if you try to just pull this off you will break the plastic retaining clips. Also note that more current version of this article change from Mac Pro 2019 to Mac Pro 2023 which has SSDs located in a different position on system board.
Reviving Mac Pro 2019 SSD Software - the details of the Apple Configurator setup to restore the T2 Firmware. This has to be done to make machine bootable again. I found that running "Step 3: Revive the firmware" failed, which set off a panic as machine is not bootable at that point. I continued on to "Step 4: Restore the firmware and erase all data" and machine was bootable once more. But as disk is completely blank needed to run "Internet Recovery" re-install of macOS.