
Commento gives Ghost a Voice.. Installing on Ubuntu 19.04
Commento is a newly developed Open Source commetry plugin for Ghost. As it is in early development getting Commento up and running is a bit of trial and error, so here are my notes on getting Commento going.
Introduction
Commento is a newly developed Open Source commetry plugin for Ghost. Unlike Disqus and like Ghost itself the code is available (on gitlab). There is choice of "Commetry as a Service" hosted offering or self host your own Commento server.
As its in early development getting Commento up and running is a bit of trial and error, so here are my notes on getting Commento going.
NOTE #1: Commento open source project is dead, if you are using Ghost I suggest using the native Member comments, if you liked Commento and wish to continue using it there is Commento fork: Commento++.
NOTE #2: I have documented and created some SQL scripts to migrate comment into Ghost here: https://just.graphica.com.au/tips/migrating-commento-comments-into-ghost/
The architecture for a self hosted Ghost Blog with Commento
The Ghost / Commento architecture can be deployed as VMs (on KVM) or as Containers. A production deployment will have multiple Ghost Blog Servers and a Commento server which are backed by MySQL (Ghost) and PostgreSQL (Commento) databases.
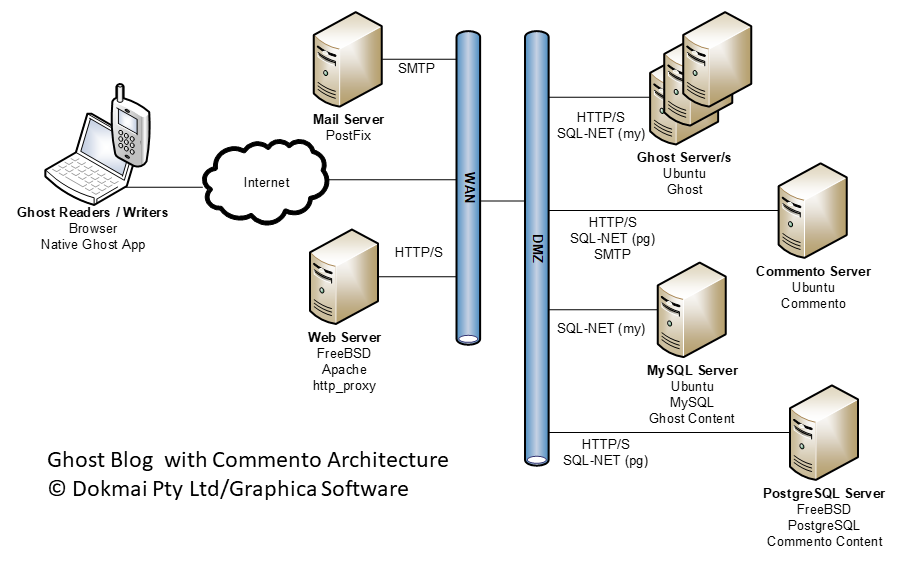
The components deployed and notes on these are:
| Component | Comments |
| Web Server | Ghost standard deployment uses NGIX on same machine as Ghost server. In prodution the web server can be split and ghost blog is via reverse proxy. Setting up Apache as front end requires configuring vhosts, ssl terminations and proxy. Notes to follow. |
| Ghost Servers/s | Ghost installation is well descriped. Migrating from sqlite3 to MySQL is covered in: Ghost content migration SQLITE to MYSQL. |
| Comment Server | See below... |
| MySQL Server | Well covered in many places... |
| PostgreSQL Server | See: FreeBSD / PHP with PostgreSQL |
| Mail Server | Appears that postfix MTA and Commento may have issue. Currently testing code fix See Commento gitlab repository. |
Adding Commento Deployment to Ghost
The build & hosting instruction for "Commento" are aid to discovery, rather than clear set of steps. Here is what you need to do to get this up and running on Ubuntu server (I am using Disco Dingo - 19.04):
Building Commeto from Source
| Step | Description | Notes | |
|---|---|---|---|
| 0 | For Ubuntu you will need to do a source instation as there is no support in Ubuntu for Arch Linux package management and alternate is Centos/Fedora (RPM) | I naievly tried to build Arch Linux pacman package manager on Ubuntu and which did not work... also as pacman has different dependany management than apt they will clash into each other | |
| 1 | Install Ubuntu build essential tools to get compiler, make and other useful stuff...sudo apt install build-essential | ||
| 2 | Install the required development tools for source build, starting with Node Package Manager Node is also used by ghost, so just follow ghost instructions. curl -sL https://deb.nodesource.com/setup_10.x | sudo -E bash sudo apt-get install -y nodejs |
I have just used the default and recommended node verson (10.x) as per Ghost | |
| 3 | Install yarn packakage dependency manager, following instructions from yarn website: https://yarnpkg.comcurl -sS https://dl.yarnpkg.com/debian/pubkey.gpg | sudo apt-key add - echo "deb https://dl.yarnpkg.com/debian/ stable main" | sudo tee /etc/apt/sources.list.d/yarn.list sudo apt update sudo apt install yarn |
Note it is important to instal yarn via yarn instructions, as if you do a "apt install yarn" you will get cmdtest installed instead, with a yarn alias. This can be removed via apt remove cmdtest | |
| 4 | Now we are ready to install go. Again I had to for a native instal, as Commento needs go v-1.12 and this is not available as apt package on 19.04 (Disco Dingo). So head to Go installation page: https://golang.org/doc/install. I used binary distribution, which is download untar, move to where you want it and update your shell path to include location ... sudo tar xvf go1.12.6.linux-amd64.tar.gz sudo mv go /usr/local export PATH=$PATH:/usr/local/go/bin |
Note that you will likely want to update you shell profile (~/.profile) to have the PATH always setup | |
| 5 | If you do not have postgresql set up you will need to do either server or client postgresql install via apt. In my case I have postgresql setup via freebsd server, so I just need client install.sudo apt install postgresql-client |
See FreeBSD / PHP with PostgreSQL for my notes on postgresql server setup. | |
| 6 | Now you are ready to build commento. As a Go application, the recommend way to do a build is to first establish a standard directory stucture. <Build Root>
bin
src
<Your Project>While this is not mandatory for Commento build which currently has all the Go code in single package and Makefile that builds to specific Commento binary output. Commento's current Makfile's are "simple" yet structured on non-generic fashion. To do build from source: git clone https://gitlab.com/commento/commento.git cd commento make prod You will find our executable and other files in: src/commento/build/prod directory (assuming you build within standard Go tree). | I had problems with standard build due to issue with email interface (issue logged on gitlab) so ended up on less well beaten track... | |
| 6 | Move / Copy Commento directory to place where you will execute it from. For me this was /usr/local/bin/commento. So steps where: sudo mkdir /usr/local/bin/commento sudo mv ~/<Build Root>/src/commento/build/* /usr/local/bin/commento sudo chown -R root:root /usr/local/bin/commento | In doing work to fix email issue I also did updates to Makefile to have standard "dist" target. I have put in merge request for email fix and Make updates. | |
| 7 | Now you are ready to run commento. There are two ways to do is by passing all inputs in via environment variables and the other is by having configuration file. However the configuration file mechanism appears to be broken. I am building on Ubunto kvm so best way for me to run commento was via systemd. Here is my example script (only has single target as DB is remote) [Unit] Description=Commento daemon service After=multi-user.target [Service] Type=simple # Environment=COMMENTO_CONFIG_FILE=/usr/local/etc/commento/commento.conf Environment=COMMENTO_ORIGIN=https://https.proxy.machine.for.ssl Environment=COMMENTO_PORT=443 Environment=COMMENTO_BIND_ADDRESS=0.0.0.0 Environment=COMMENTO_POSTGRES=postgres://pgdb-serid:password@postgresql.server.machine:5432/your_commento_db_name?sslmode=disable Environment=COMMENTO_SMTP_HOST==mail.host Environment=COMMENTO_SMTP_PORT=587 Environment=COMMENTO_SMTP_USERNAME=mail-user-id@where.ever Environment=COMMENTO_SMTP_PASSWORD=mail-password Environment=COMMENTO_SMTP_FROM_ADDRESS=mail-address@domain Environment=COMMENTO_SMTP_HELLO_FQDN=special.fix.i.added.for.bug Environment=COMMENTO_TWITTER_KEY=these-get-added-later Environment=COMMENTO_TWITTER_SECRET=if-you-want-to-enable-oauth-login Environment=COMMENTO_GITHUB_KEY=ditto Environment=COMMENTO_GITHUB_SECRET=ditto Environment=COMMENTO_GITLAB_KEY=ditto Environment=COMMENTO_GITLAB_SECRET=ditto ExecStart=/usr/local/bin/commento/commento [Install] WantedBy=multi-user.target | My testing with config file also failed. Also if you are deploying commento as container via Docker then configuration is managed differently The COMMENTO_ORGIN parameter is key to getting commento propertly integrated and I cover this in following section on getting SSL working with commento. | |
Adding Reserve Proxy via Apache for HTTPS
As Commento does not provide native SSL support the way this is achieved is by putting a reverse proxy in front of commento which provides SSL termination. This model is the same as Ghost deployment. There are two ways to achive this.
- Use COMMENTO_ORIGIN configuration item to ensure that all commento server scripts always go to Reverse Proxy, which then does https termination and forwards request as http to commento server. In Apache this is achieved via the mod_proxy and mod_proxy_http modules
- Have COMMENTO_ORIGIN as the commento server and have the proxy do HTML payload URL substitutions to ensure that requests are directed to the proxy for https termination and forwarding. In Apache this is achieved via the mod_proxy and mod_proxy_html modules.
I used option 1 as it is much simpler and less prone to failure and strange behaviour.
Here is how it looks:
- Browser <-> { Proxy / COMMENTO_ORIGIN } <-> { Commento / COMMENTO_PORT }
Where:
- Browser - always talks HTTPS to Proxy
- Proxy - always talks to Browser via address / protocol (HTTPS typically) as per COMMENTO_ORIGIN and to Commento via HTTP (never HTTPS) at port COMMENTO_PORT
- Commento - Always puts COMMENT_ORIGIN as URL target host for request for all script URLs so they go to Proxy, not directly to the Commento server.
The example apache configuration to get this work is here:
#
# File: virtual secure host for commento
#
<VirtualHost *:443>
        ServerName your.commento.host
        DocumentRoot "/usr/local/www/apache24/data/wherever"
        ErrorLog "/var/log/httpd-commentoHost-error.log"
        CustomLog "/var/log/httpd-commentoHost.log" combined

        ProxyRequests off

#   SSL Engine Switch:
#   Enable/Disable SSL for this virtual host.

SSLEngine on

#
# Let's Encrypt standard certifcate locations...
#
SSLCertificateFile "/usr/local/etc/letsencrypt/live/your.commento.host/cert.pem"
SSLCertificateKeyFile "/usr/local/etc/letsencrypt/live/your.commento.host/privkey.pem"
SSLCertificateChainFile "/usr/local/etc/letsencrypt/live/your.commento.host/chain.pem"
SSLCACertificatePath "/usr/local/etc/letsencrypt/live/your.commento.host"
SSLCACertificateFile "/usr/local/etc/letsencrypt/live/your.commento.host/fullchain.pem"

#   SSL Engine Options:
#SSLOptions +FakeBasicAuth +ExportCertData +StrictRequire
<FilesMatch "\.(cgi|shtml|phtml|php|js)$">
    SSLOptions +StdEnvVars
</FilesMatch>
<Directory "/usr/local/www/apache24/cgi-bin">
    SSLOptions +StdEnvVars
</Directory<

#   SSL Protocol Adtalkments:
BrowserMatch "MSIE [2-5]" \
         nokeepalive ssl-unclean-shutdown \
         downgrade-1.0 force-response-1.0

#   Per-Server Logging:
#   The home of a custom SSL log file. Use this when you want a
#   compact non-error SSL logfile on a virtual host basis.
CustomLog "/var/log/httpd-talk-ssl_request.log" \
          "%t %h %{SSL_PROTOCOL}x %{SSL_CIPHER}x \"%r\" %b"

<Directory "/usr/local/www/apache24/data/whereEver">
    #
    # Options Indexes FollowSymLinks
    Options FollowSymLinks
    #
    AllowOverride None
    #
    # Controls who can get stuff from this server.
    #
    Require all granted
</Directory>

<Location "/">
        SSLRequireSSL
        ProxyPreserveHost On
        ProxyPass "http://your.commento.host:443/"  <<== COMMENTO_PORT
        ProxyPassReverse "http://your.commento.host:443/" <<== COMMENTO_PORT
        RequestHeader set X-Forwarded-Proto "https"

    #
    # note: that port is 443 but commento is still using HTTP only
    #       Reverse Proxy Apache server will expose HTTPS on 443
</Location>

</VirtualHost>
Adding Comments to Ghost Blog
Now that you have a running Commento server going, you should do initial login to establish yourself as Commento server instance owner. Just do https to your target server (if you have got proxy up and running, or direct http to URL you have set COMMENTO_ORGIN to.
To add commetry to any given Ghost site requires:
- Add site to Commento via configuration UI
- Add Commento script to Ghost theme.
This is documented well on ghost site.
Adding Twitter, GitHub & GitLab OAuth Login Integration
To be completed ...
Now that you have an commento server running you can add experience enhancement by allow social logins, which are controlled via the COMMENTO_TWITTER_ID, COMMENTO_TWITTER_SECRET and related configuration variables.
Other Problems...
I run into two problems with Commento and email integration:
- Firtly, my email server is set up to authenticate users sending email from local domain (to avoid open SMTP mail relay). Then Commento does STARTTLS to establish SSL connection to mail server. The email was failing due to lack of Let's Encrypt CA certifate in Ubuntu installation. The Ubuntu installation gets its root SSL certificates from Mozilla collection (all certificates in /etc/ssl are softlinks to /usr/share/ca-certificates/mozilla one) and currently Let's Encrypt signs its certificate via intermediate “Let’s Encrypt Authority X3”, which is not in this bundle. Solution was to download the “Let’s Encrypt Authority X3” directly and add link to this in /etc/ssl . This fixs "unknown signing authourity" error.
- The second issue was that the Go "net/smtp" package was using "localhost" in EHLO exchange, which postfix MTA was rejecting. This is behavior is buried inside the golang package and so I had no option, but to have to take a fork of existing code and add wrapper on the existing SendEmail function and add and use COMMENTO_SMTP_HELLO_FQDN configuration item to send full name rather than "localhost". This fix is currently candidate for upstream merge. See below for deftails.
Commento Upstream Merge Request:
Sometimes using Open Source means you need to go a bit deeper than initially expected ...
Core Change:
My core change was to add smtp.SendMail wrapper SendMailEx (based on golang "net/smtp" code) which takes extra parameter to allow use of FQDN in ELHO/HELO exchange. My commento instance is now working with postfix MTA. This introduced a new configuration item: "COMMENTO_SMTP_HELLO_FQDN" to new behaviour. I have tested this change and no-longer get postfix MTA failure.
NOTE: I selected to use cut of existing net/smtp code as basis for updates rather than gomail, as gomail project has no maintainer and new forked project (mail) appears to be under a cloud, due dispute on ownership. net/smtp itself is locked, so there is no choice but to use workaround. My SendMapEx still uses net/smtp for the heavy lifting.
Other Changes:
In trying to get Core Change completed I had issues with build process and so also did the following:
- A. Split commento go code into two packages" "commento/api" for function code and "main" for commento main executable.
- B. Updated the Makefiles to seperate the build targets (build, install, clean, disk etc) from the environments (dev, test, prod) and also decouple front end verbosity (verbose / quiet), from the target environment (dev, test, prod).
- C. To decouple frontend verbosity I added m4 processing step. This was my hack as I am not experienced with gulp but suspect you could achieve same with this.
Impact:
My changes have touched a much larger code foot print than I initially anticipated :-( . However I think there is value in these updates so I am adding request to merge with upstream. Once merged I am now familiar enough with code, that I could tackle some other of the logged issues, as backlog is getting rather long ...
There we have it and proof is that you can provide comments below..
NOTE: as of May 2023, commentry is now via native Ghost member function.