STATUS #1: Mid March 2020 - Testing on KVM and outline defined...
STATUS #2: Early May 2020 - Bug with Ubuntu 20.04 / KVM / QEMU / bhyve nesting has stopped progress
STATUS #3: June 2020 - Finished for now.. mostly working with a few bugs still
STATUS #4: July 16 2020 - All found bugs in progress to get fixes feed into next set of releases
Most IT literate people know VMWare, MS Hyper-V and Linux Kernal Virtual Machine (KVM), but bhyve is relatively obscure. Bhyve is the hypervisor that runs on FreeBSD and supports Linux, FreeBSD and Windows guests. For those comfortable with QEMU / KVM / libvirt, there is a FreeBSD / bhyve port of QEMU and libvirt, so you can use some of the tooling that you are familar with to create guest VMs.
The FreeBSD bhyve / qemu / libvirt tooling is poorly documented, so here are my notes on getting this running, on FreeBSD 12.1 RELEASE.
NOTE: This example is running bhyve as nested hypervisor on FreeBSD running top of QEMU / KVM. The Layer 1 - FreeBSD bhyve VM is configured with 2 NICs, one for admin access and other providing quest network bridge.
Installation and Configuration of (nested) bhyve Host
This example is based on nested virtualisation scenario with:
The KVM / QEMU configuration for FreeBSD 12.1 bhyve host are:
QEMU Q35 v4.2 VM with OVMF (UEFI), 4 x CPUs (as need 2 x CPU are for guest) with 4096 MB RAM
SATA HD & CD
2 x vmxnet3 NIC (these will appear as vmx0 & vmx1 in running VM)
Start by installing FreeBSD into VM and then build a custom kernel that disables netmap (this is required due to bug with netmap & kvm virtualizer). The relevant change is in /usr/src/sys/amd64/conf/GENERIC:
...

# Netmap provides direct access to TX/RX rings on supported NICs
#device         netmap                  # netmap(4) support

...
Bhyve is installed as part of base FreeBSD, so you just need to load the vmm kernel module. In this example I am using UEFI boot, so we need to install the bhyve UEFI firmware package. Here is sample configuration for UEFI, network bridge, tap and terminal access support configured via /etc/rc.conf & /boot/loader.conf:
# pkg install bhyve-firmware
---
--- Configure /etc/rc.conf to load vmm (bhyve) and
---     null model terminal (nmdm) support
---
# cat /etc/rc.conf
clear_tmp_enable="YES"
hostname="HOST.COM"
ifconfig_vmx0="DHCP"
ifconfig_vmx1="DHCP"
sshd_enable="YES"
cloned_interfaces="bridge0 tap0"
ifconfig_bridge0="addm vmx1 addm tap0"
kld_list="nmdm vmm"
---
--- Configure tap up on open
---
# cat /etc/sysctl.conf
net.link.tap.up_on_open=1
---
--- Configure bug workaround in /boot/loader.conf
--- By disabling virtual interupt delivery (vid)
---
# cat /boot/loader.conf
hw.vmm.vmx.use_apic_vid=0
Once you have set up your configuration, reboot the bhyve host.
NOTE 1: For details on configuration see FreeBSD handbook, for nested virtualisation bug see report (and thanks to Peter Grehan for work-around).
See below for CPU report from: /var/run/dmesg.boot with VID support,
To support the byhve guest VM there is a network bridge0 & tap0 which have been added to the second interface vmx1. In above example vmx1 is configured on bhyve host with DHCP (but it could also have been provided a static IP address). If you do not configure an IP address on the interface that is associated to tapN interface that is specified for bhyve network (see below) then the virtual network on the Layer 2 - guest will not come up correctly.
NOTE 2: Need to see if there is way to get Layer 2 - guest network to come up without having to have to provide IP address on corresponding Layer 2 - bhyve host.
Run bhyve UEFI VM in console mode
Now verify that bhyve is configured correctly by running new vm. This will require boot cd to be copied onto Layer 1 host and creation of virtual disk image:
---
--- Create disk image to install machine on
---
# truncate -s 5G VM_DSK.img
---
--- now boot machine via CDROM to start install
---
# bhyve -AHP -c 2 -m 2048 -s 0:0,hostbridge -s 1:0,lpc -s 2:0,e1000,tap0 -s 3:0,ahci-hd,./VM_DSK.img -s 4:0,ahci-cd,./FreeBSD-12.1-RELEASE-amd64-dvd1.iso -l com1,stdio -l bootrom,/usr/local/share/uefi-firmware/BHYVE_UEFI.fd VM_NAME
---
--- If you are prompted for console type then select default (vt100)
---   the install process is as per standard FreeBSD install
---   once done then reboot the machine which will bring you back to
---   original shell
---
--- Now you have installed disk image, restart machine from disk
---   by removing cd device from command line
---
# bhyve -AHP -c 2 -m 2048 -s 0:0,hostbridge -s 1:0,lpc -s 2:0,e1000,tap0 -s 3:0,ahci-hd,./VM_DSK.img -l com1,stdio -l bootrom,/usr/local/share/uefi-firmware/BHYVE_UEFI.fd VM_NAME
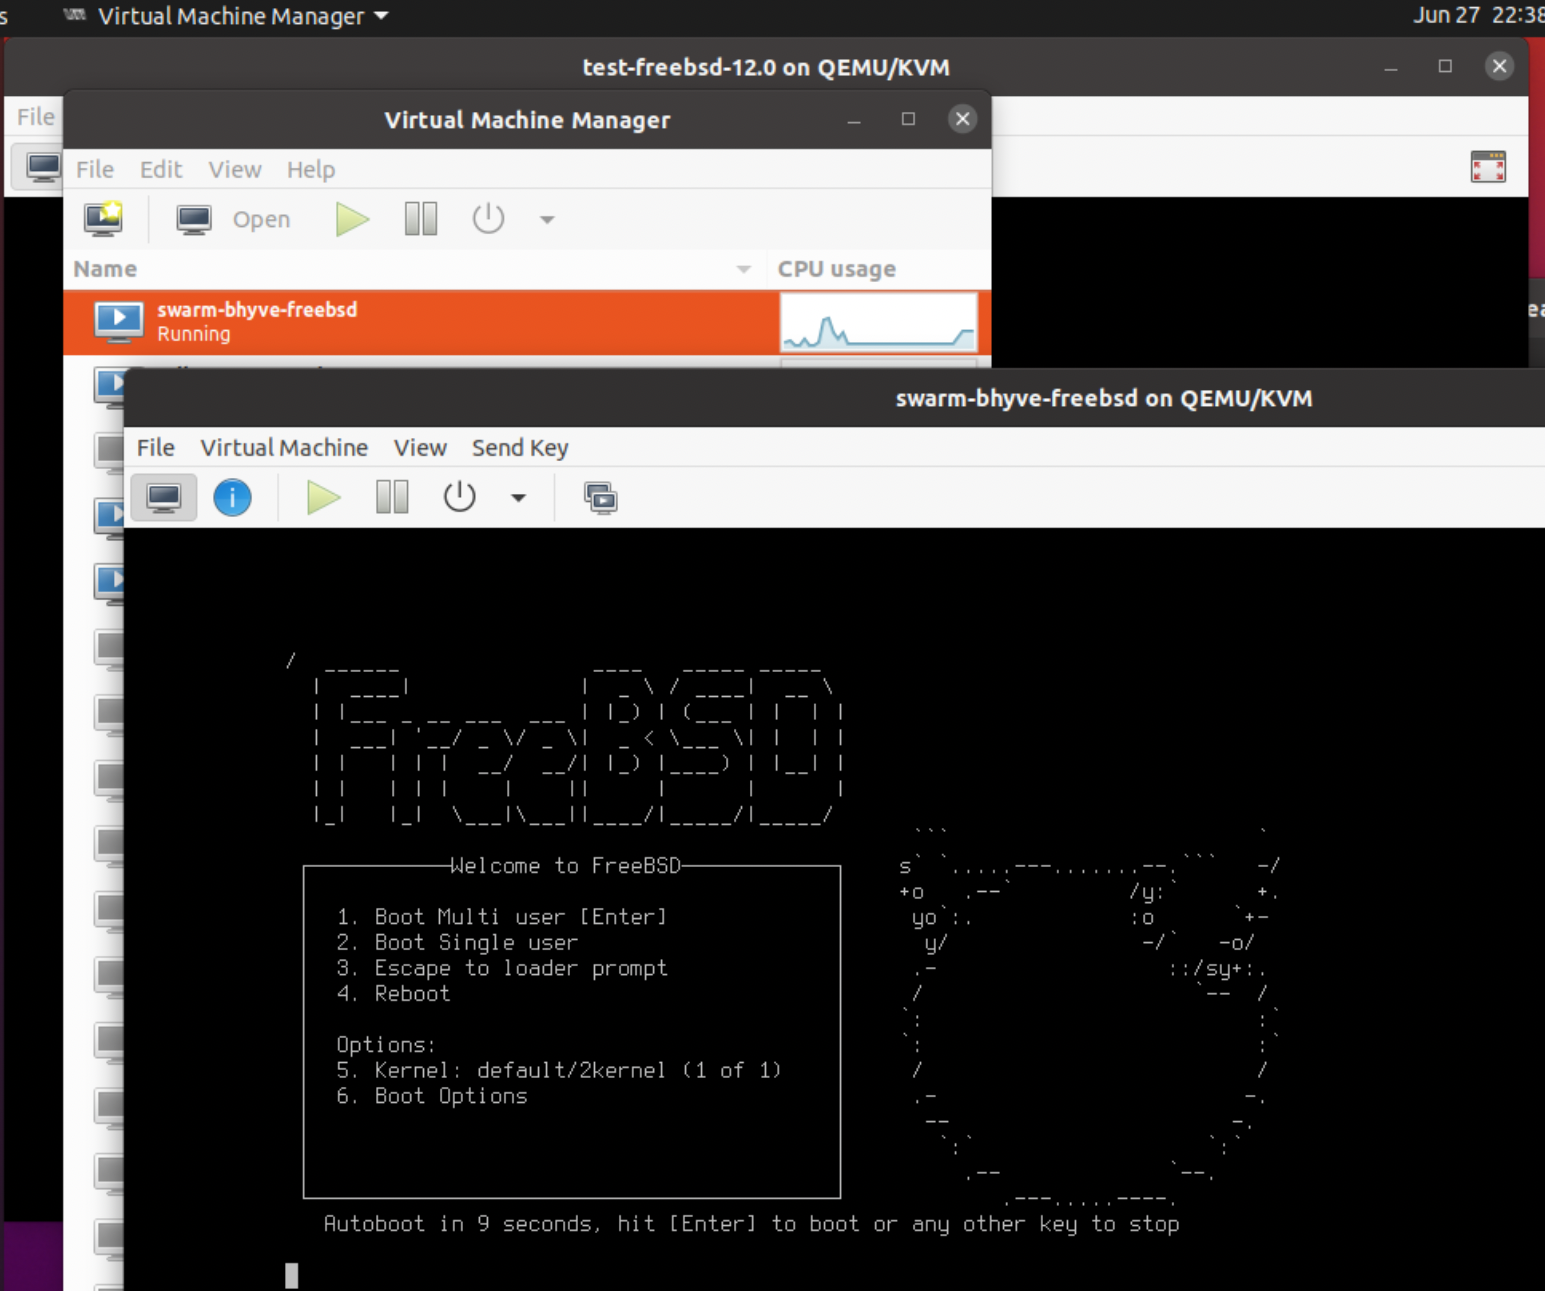
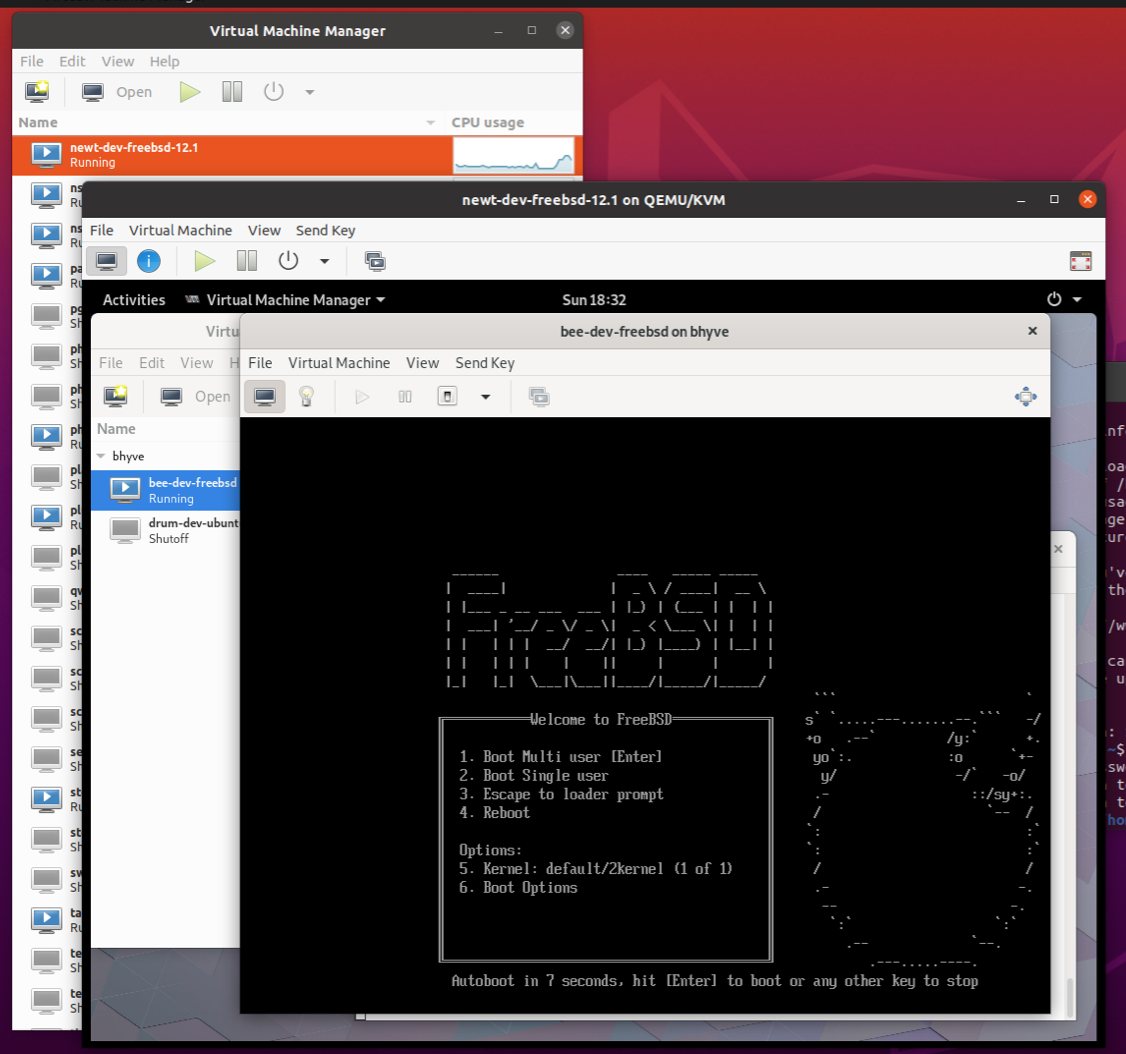
Here is screen grab showing progress to this point (2 bugs found and 1 workaround) with "Layer 2 - FreeBSD guest on Layer 1 - FreeBSD bhyve host":
Once you have got to this point next step is to test running Layer 2 - FreeBSD guest VM "headless". In the example boot is using com1 which is connected to stdio, so VM is running in foreground and sending I/O to shell. To run multiple VMs you need to put VMs in the background and still be able to connect to console if required. This is done using the "null modem driver" (nmdm), which provides a virtual serial interface that you can connect to using cu (call UNIX) terminal emulator. Each null model instance has an id (number) and A/B part, where A is DTE (data terminal equipment) and B is DTE (data terminal equipment), hence need for "null modem" between the two (i.e. no DCE - data communications equipment between them).
---
--- Run VM sending com1 to null modem device (nmdm) (note: id 0 - end A)
---
# bhyve -AHP -c 2 -m 2048 -s 0:0,hostbridge -s 1:0,lpc -s 2:0,e1000,tap0 -s 3:0,ahci-hd,./VM_DSK.img -l com1,/dev/nmdm0A -l bootrom,/usr/local/share/uefi-firmware/BHYVE_UEFI.fd VM_NAME
---
--- And on another shell connect to terminal using cu
---   (note: id 0 - end B)
---
# cu -l /dev/nmdm0B
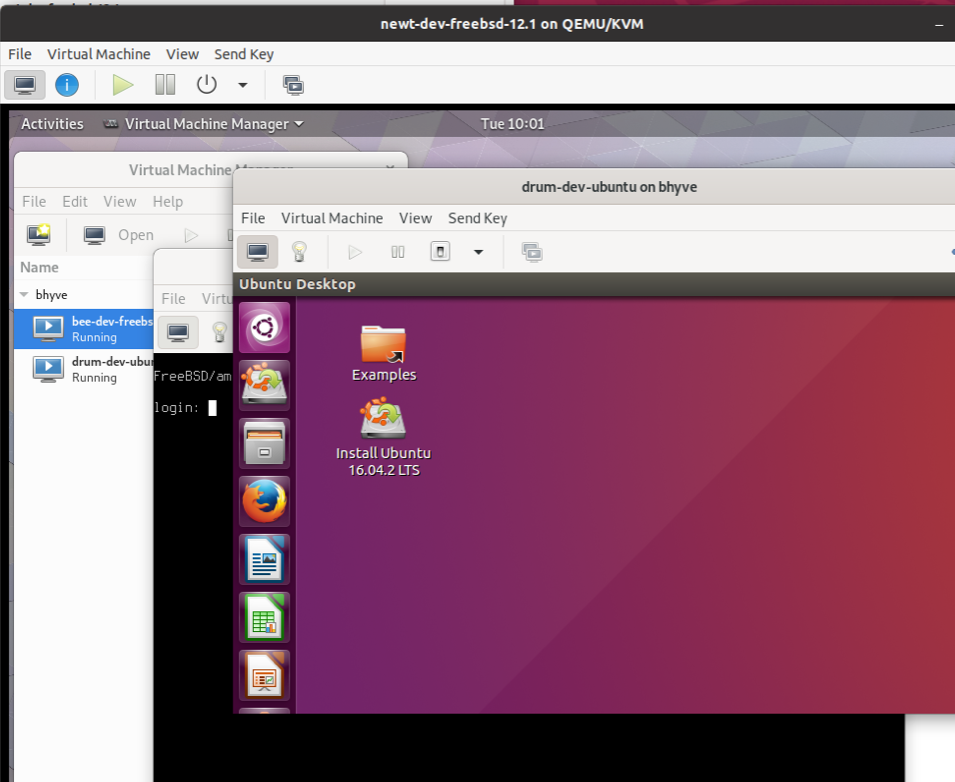
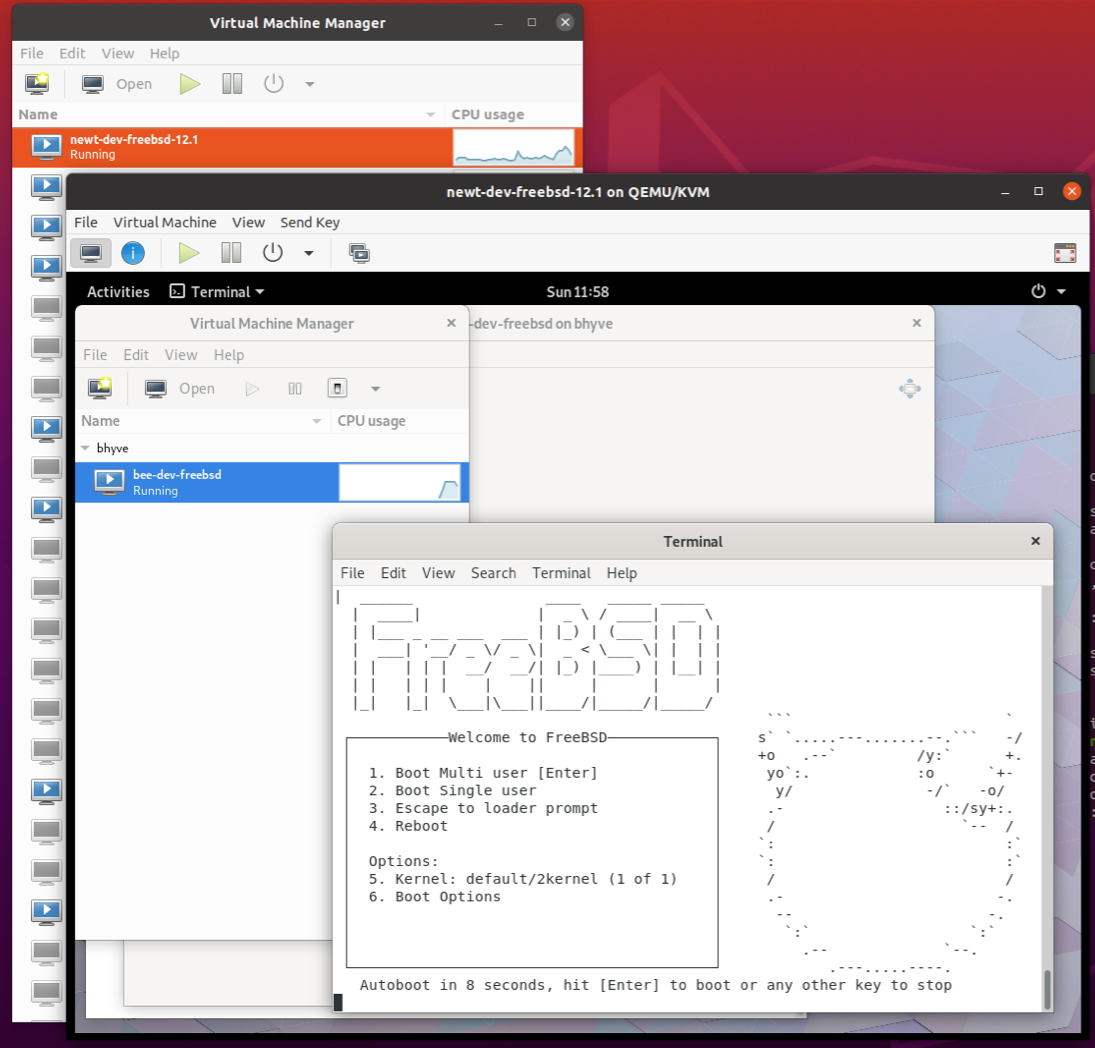
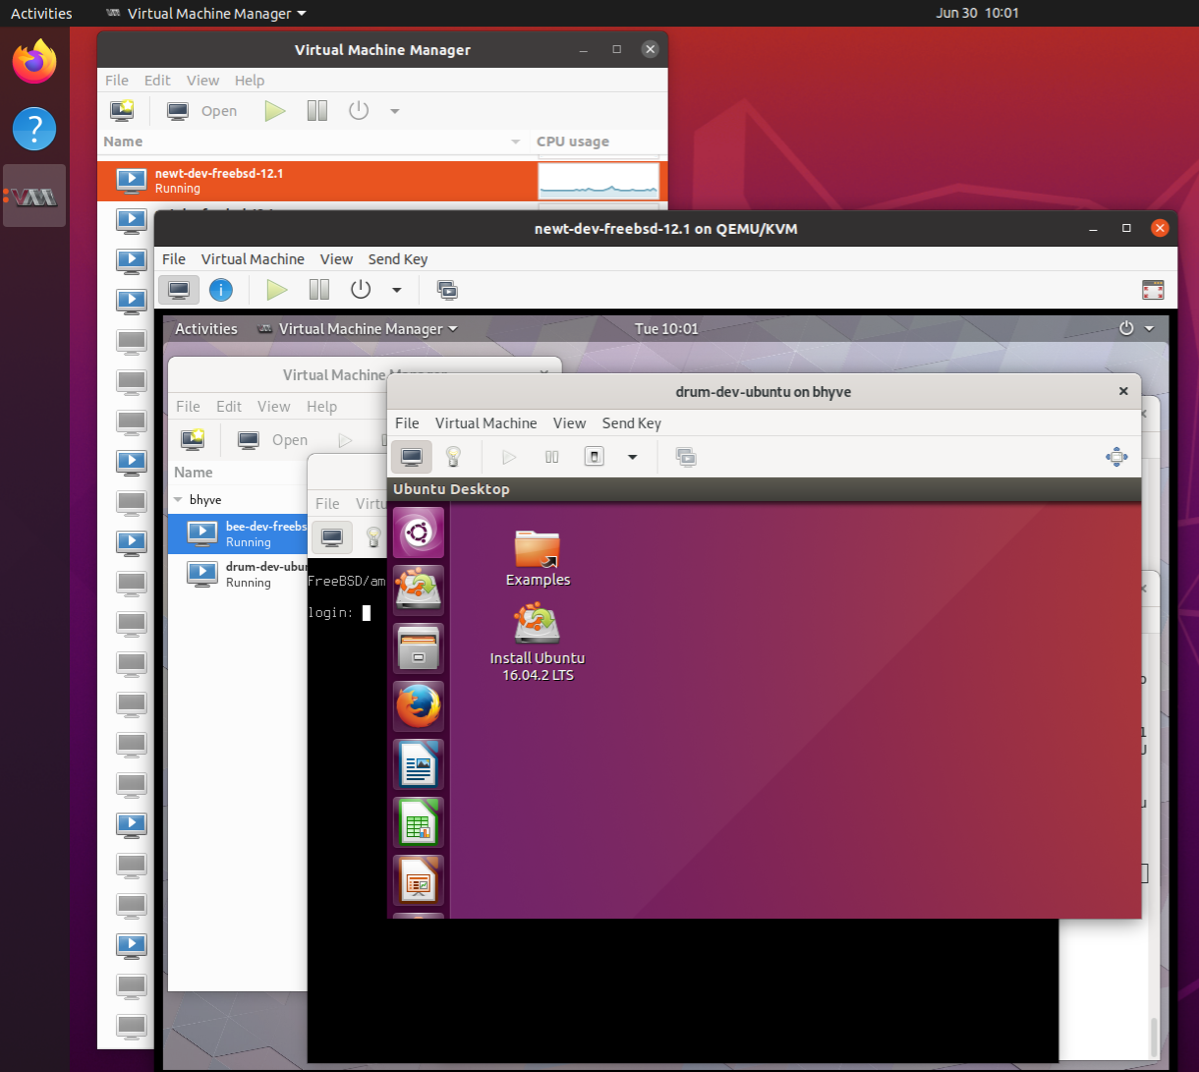
To test this you need to either put initial bhyve invocation into background, ssh into machine to get new shell to run cu in or run in FreeBSD Desktop and open multiple terminal windows. Jumping ahead here is VM running via libvirt and Virtual Machine Manager (VMM) with FreeBSD boot via cu on seperate terminal window.
Nested Layer 2 - Guest VM with com1 connected to null modem device
At this p0int you have pretty much all you need to spin up multiple Layer 2 - FreeBSD guests on bhyve and be able to access these via null model (to check boot) or ssh once booted.
Running bhyve VM in graphical mode
If you have VM which need to access graphics then you will need to add UEFI graphics support by adding "frame buffer" device (see -s 29,fbuf in example). The frame buffer output is send to VNC and in the example the boot is set to wait until VNC client is connected:
---
--- Run VM with Graphical Console by adding in framebuffer device
---    this has wait option which means machine boot will wait until
---    VNC is connected.
---
# bhyve -AHP -c 2 -m 2048 -s 0:0,hostbridge -s 1:0,lpc -s 2:0,e1000,tap0 -s 3:0,ahci-hd,./VM_DSK.img -s 29,fbuf,tcp=0.0.0.0:5900,w=800,h=600,wait  -l com1,/dev/nmdm0A -l bootrom,/usr/local/share/uefi-firmware/BHYVE_UEFI.fd VM_NAME
Running this example, you will see that boot mesages are displayed on both com1 and framebuffer (by connected to VNC port). Now this is all tested its time to add QEMU and libvirt
Adding QEMU & libvirt
Initailly I tried to get bhyve running by jumping straight to QEMU / libvirt, but found I had to do step by step testing and verification of nested bhyve host before trying to get QEMU / libvirt running.
The reason for this is that the available documentation provides an outline, but does not help with diagnosing problems, so you need to do step by small step to ensure everything is working. On Ubuntu Desktop it is pretty easy to get VMs up and running using KVM / QEMU and libvirt and managing the VM creation and running using Virtual Machine Manager (VMM) without a lot of detailed knowledge of underlying hypervisor and libvirt. This is not the case with FreeBSD installation.
Before going to QEMU / libvirt and VMM you need to get FreeBSD Desktop running. The simplest, quickest and easily repeated way to do this is by using binary packages for installation rather then building from source via ports collection.
Reboot and verify that virtualisation support is working:
$ virt-host-validate
 BHYVE: Checking for vmm module                                              : PASS
 BHYVE: Checking for if_tap module                                           : PASS
 BHYVE: Checking for if_bridge module                                        : PASS
 BHYVE: Checking for nmdm module                                             : PASS
To get to this stage you need to have: vmm (bhyve) and nmdm loaded and bridge & tap network interfaces configured.
Getting VM running with QEMU / libvirt
Using the Virtual Machine Manager (VMM) should be the simply way to get a bhyve VM up and running, but currently there is only partial support for bhyve configurations. So getting a valid working machine will require you to do some manual editing to the libvirt XML.
In particular VMM does not provide in-built support creating bhyve hosted VMs with: UEFI, null model console (nmdm) or graphics (frame buffer) configuration. To add these to your VM definition requires editing the libvirt XML. In turn you will need to understand the bhyve command line interface that libvirt generates to configure the VM.
I have only tested with UEFI as this is current default technology and is required to get a graphical boot to work.
The simplest VM will have:
CPU + RAM - allow for 2 CPUs + 2048 MB
UEFI ROM - for current technology, console and optional graphical boot
Only disk is attached with no CD-ROM as machine already has FreeBSD OS installed on HD, if you need to do initial install then you should also have FreeBSD boot CD attached
Network is atttached via "bridge0" as per /etc/rc.conf
serial port (com1) is via null modem at /dev/nmdm0A (master) with /dev/nmdm0B (slave).
NOTE: For VMM to connect to bhyve the libvirt connection is: "bhyve:///system"
Running bhyve on FreeBSD Desktop (GNOME)
In the above example the VM has vga device, but no VNC graphics connected, so there will be no visible boot screen and can be removed. On boot there is no visible console available on VMM, rather you attach to machine via cu on /dev/nmdm0B (as per command line case described above). The running machine is shown in screen shot: "Nested Layer 2 - Guest VM with com1 connected to null model device" above.
The command line that is executed by libvirt can be seen via virsh (after removing vga):
I also tried to boot / install Ubuntu 18.04 & 20.04 but these both result in VM kernel panic on boot (see below section on "Ubuntu 18.04 / 20.04 Panic on Boot" which work around).
So having uncovered a few more potential bugs (VMM not displaying correctly & nested Ubuntu kernel panic), this is the end of tips on running bhyve nested on Ubuntu 20.04 KVM / QEMU hypervisor.
Here is the libvirt XML for final FeeBSD 12.1 test:
NOTE: I have testing with various VMM video options and it appear that it does not matter if you specify "vga" or "gop" as the video option as the generated bhyve command still has "fbuf,tcp=127.0.0.1:0" frame buffer and VNC connection in either case, so libvirt is aware of details of bhyve graphical console support.
Summary
It is possible to run Layer 1 - FreeBSD bhyve host on top of Layer 0 - Ubuntu 20.04 KVM Host.
My objective in doing this was to have FreeBSD / bhyve / collectd testing environment (without need for dedicated server). I am comfortable that this goal can be met. In my case I will only be using Layer 2 - FreeBSD UEFI guests, so the UEFI graphical boot capabilities are optional.
My initial plan was not to get this deep into setting up bhyve, but in uncovering various bugs and lack of documentation on this deployment scenario meant that on a part time basis this exercise has taken some time to complete.
As per my summary on FreeBSD Desktop, it is simpler use Ubuntu Desktop, if you are creating: Ubuntu, Windows and non-FreeBSD VMs and for most I believe it is much easier to just use Ubuntu & KVM / QEMU / libvirt. The problem for my case is that I am running nested scenario which adds a layer of complexity.
In FreeBSD scenario where you are running server VMs, having graphical console helps with making VMM usage simpler but console is also available via null model driver (nmdm), which is helpful for headless boot.
Ubuntu does not support headless boot without need to create a special boot disk and edit grub loader ;-( .
There is some merit to using libvirt as having virsh available allows VM life-cycle management in a consistent manner. Using libvirt also lets you easily setup your VMs to auto-start on machine boot, avoiding need to create bhyve specific startup scripts.
Now off to report some bugs ... and happy bhyve'ing.
Rebooting bhyve Guest VM
Bhyve will terminate a running VM on reboot. This means that if you do a reboot of VM when it is running then it will not automatically reboot the same running instance. Instead it will stop the VM and then you need to restart it via bhyve command to complete the reboot.
In case of when VM is running via Virtual Machine Manager (VMM) the UI does not get refreshed correctly (bug to report...) and you need to exit VMM and restart it to get refreshed view.
Also note that if you are running detached using nmdm and you have terminal connected to B side then the device will stay up over reboot and on restart you can see boot process complete.
Ubuntu 18.04 / 20.04 Panic on Boot
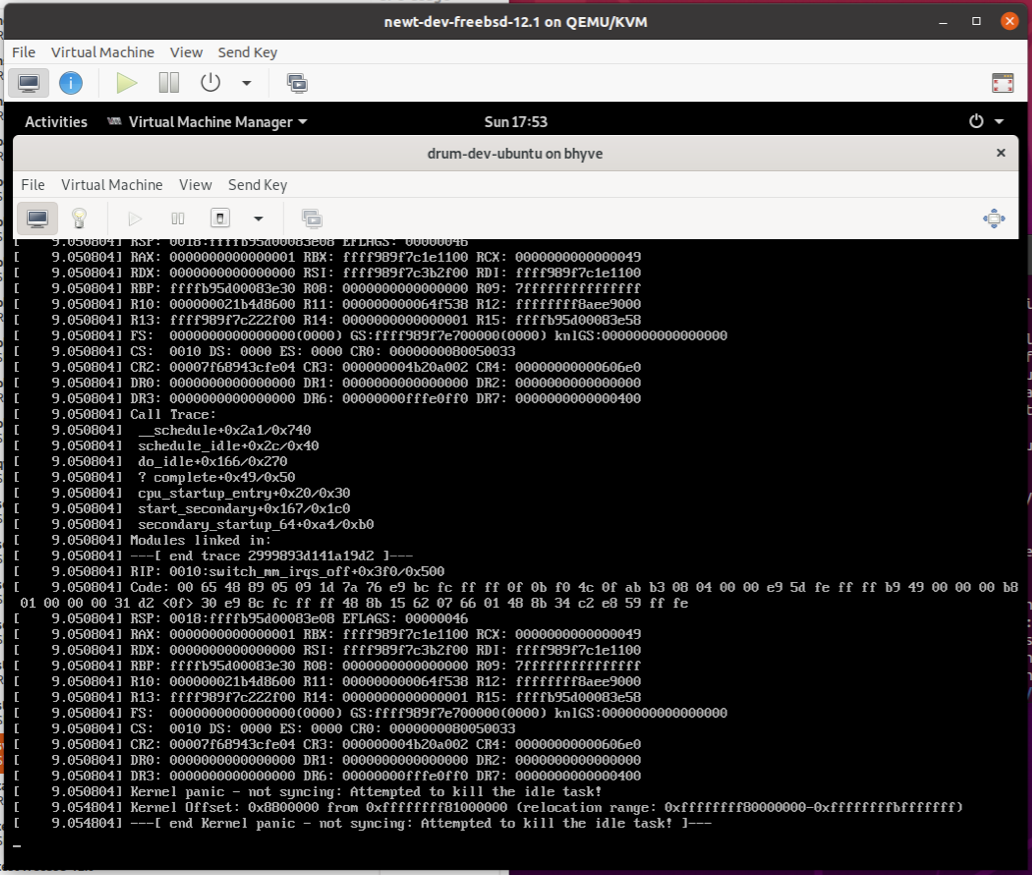
Here is an unsucessful graphical boot attempt with Ubuntu 20.04 (kernel panic):
Nested Layer 2 - Ubuntu with graphical UEFI boot failure
Note: With Ubuntu having "vgaconf='on'" resulted in error on boot (available from Layer 1 - bhyve host /var/log/libvirt/bhyve/VM_DOMAIN_NAME.log) result in error "pci_fbuf: VGA rendering not enabled", while "vgaconf='off'" result in kernel panic above.
# tail /var/log/libvirt/bhyve/VM_DOMAIN_NAME.log
/usr/sbin/bhyve -c 2 -m 2048 -A -I -u -H -P -s 0:0,hostbridge -l bootrom,/usr/local/share/uefi-firmware/BHYVE_UEFI.fd -s 2:0,ahci,hd:/usr/VM_DSK.img,cd:/usr/ubuntu-20.04-desktop-amd64.iso -s 4:0,e1000,tap1,mac=XX:XX:XX:XX:XX:XX -s 3:0,fbuf,tcp=127.0.0.1:5900,vga=on -s 1,lpc -l com1,/dev/nmdm1A VM_DOMAIN_NAME
pci_fbuf: VGA rendering not enabled
/usr/sbin/bhyve -c 2 -m 2048 -A -I -u -H -P -s 0:0,hostbridge -l bootrom,/usr/local/share/uefi-firmware/BHYVE_UEFI.fd -s 2:0,ahci,hd:/usr/VM_DSK.img,cd:/usr/home/ubuntu-20.04-desktop-amd64.iso -s 4:0,e1000,tap1,mac=XX:XX:XX:XX:XX:XX -s 3:0,fbuf,tcp=127.0.0.1:5900,vga=off -s 1,lpc -l com1,/dev/nmdm1A VM_DOMAIN_NAME
rdmsr to register 0x140 on vcpu 0
rdmsr to register 0x48 on vcpu 0
rdmsr to register 0x140 on vcpu 1
wrmsr to register 0x48(0) on vcpu 1
rdmsr to register 0x34 on vcpu 0
wrmsr to register 0x49(0x1) on vcpu 1
vm_run error -1, errno 6
fbuf frame buffer base: 0x882800000 [sz 16777216]
So it is possible to run Ubuntu 20.04 Desktop and Server within nested deployment.
NOTE: I have submitted libvirt bug/feature request to allow control of the PCI-ISA bridge device slot, which is required for libvirt to generate correct slot (#31)
Controlling bhyve command line flags using libvirt XML
In tracking down bugs with using libvirt and bhyve Roman Borgorodskiy the maintainer of libvirt bhyve driver has provided fix to PCI-ISA slot control bug and also provided missing information on controlling the bhyve command line flags. These are needed to get successful Ubuntu 20.04 boot (cd-rom or hd) with bhyve and libvirt.
Here are the various libvirt features controlled by XML and the corresponding bhyve flag equivalents:
<acpi> - controls bhyve -A flag, remove this and machine will not have this flag enabled
<apic> - controls -I flag, remove this and machine will not have this flag enabled
<msrs> - controls the bhyve -w flag and should be set to <msrs unknown='ignore'/>
<clock> - controls the bhyve -u flag to disable this set <clock offset='localtime'/> to enable set <clock offset='utc'/>
<controller type='isa'> - this is new isa controller device that allows control of PCI slot for lpc device. Fix to add this new controller type is being submitted into up stream libvirt bhyve driver and show should flow down to ports and pkg in fullness of time ...
The following XML provide example which results in flags -w -u -H -P and LPC on pci slot 31:
...
...
  <features>  -- no <acpi> feature in XML to remove -A flag
    <msrs unknown='ignore'/> -- controls -w flag
  </features>
  <clock offset='utc'/>  -- 'localtime' to remove -u flag
...
...
    <controller type='isa' index='0'>
      <address type='pci' domain='0x0000' bus='0x00' slot='0x1f' function='0x0'/>
    </controller>
...
...
NOTE: Some of the flag validation appears to have been fixed in libvirt 6.5 to test I had to recompile port with additional patches provided by bug fix.
Reference & Links:
BSD Handbook - Section 21.7 FreeBSD as a Host with bhyve. This provide information on how to configure bhyve and networking but not libvirt on FreeBSD
libvirt bhyve driver - provides example configurations for libvirt with bhyve
FreeBSD Bugzilla & Ubuntu LaunchPad - Cross Post bug report: Ubuntu 20.04 KVM / QEMU Failure with nested FreeBSD bhyve
QEMU upstream bug - now posted nested virtualisation APIC interupt handling to upstream QEMU
libvirt - bug/feature request to allow finer control of PCI-ISA device and control flags
FreeBSD Bugzilla - Ubuntu 18.04 & 20.04 VM Kernel Panic on boot, with work around fix posted
FreeBSD 11.3 / 12.X and SCSI, VirtIO & Networking Bug with QEMU Q35 VM - when you find a bug in an Open Source reporting it and helping with diagnosis is a key way of helping to contribute. The work around for this bug is to build a custom kernel with /usr/src/sys/amd64/config/GENERIC update to disable "dev netmap" disabled.
TianoCore - the Open Source UEFI project kick started by Intel and basis of QEMU OVMF (Open VM Firmware) implementation